Honda Fit: Bluetooth® HandsFreeLink®
This section describes how to operate Bluetooth® HandsFreeLink®. You can place and receive phone calls using your vehicle’s audio system without handling your cell phone.
 PHONE button
Select an item.
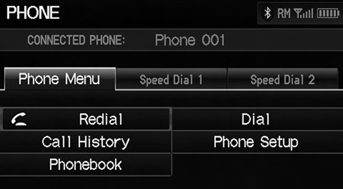
The following items are available:
• Redial
: Dials the last number.
• Call
History
: Displays the call history.
• Phonebook
: Displays the cell phone’s imported phonebook.
• Dial
: Makes a call by entering the phone number.
• Phone
Setup
: Sets up the HFL features.
• Speed
Dial
1, 2
: Makes a call to stored speed dial entries.
You can control the HFL system using voice commands.
To use HFL, you need a Bluetooth-compatible
cell phone. For a list of compatible phones,
pairing procedures, and special feature
capabilities:
• U.S.: Visit automobiles.honda.com/
handsfreelink.
• Canada: Visit www.handsfreelink.ca.
• Call HandsFreeLink customer support at (888) 528-7876.
Voice Control Tips
• Aim the vents away from the ceiling and close the windows, as noise coming from them may interfere with the microphone.
• Press and release the  (Talk)
button before
giving a command.
• If the microphone picks up voices other than yours, the command may be misinterpreted.
• To change the volume level, use the audio system’s volume knob or the remote audio controls.
■Help Features
Say “Hands-free help” or
“Help” any time to get help or hear
a list of
commands.
Bluetooth® Wireless Technology
Bluetooth® name and logos are registered trademarks owned by Bluetooth SIG, Inc., and any use of such marks by Honda Motors Co., Ltd., is under license. Other trademarks and trade names are those of their respective owners.
HFL Limitations
An incoming call on HFL will interrupt Bluetooth® Audio when it is playing. Audio will resume when the call is ended.
Certain touchscreen functions are disabled while the vehicle is moving.
- Pairing a Phone
- Setting Up Speed Dialing
- Editing Phone Information
- Phone Setup
- Making a Call
- Receiving a Call
- HFL Menus
See also:
M/T Differential Thrust Clearance Adjustment (M/T)
Special Tools Required
Driver Handle, 40 mm I.D. 07746-0030100
Remove the left driveshaft side oil seal from the transmission housing.
If you remove the 80 mm shim (A) from ...
Playing the FM/AM Radio
■Radio Data System (RDS)
Provides text data information related to your selected RDS capable FM
station.
■ RDS INFO ON
Press the TITLE button while listening to an RDS capable stati ...
Entering a Phone Number
PHONE button
►Dial
1. Enter a phone number.
2. Select Dial to begin dialing.
A command that consists of several numbers can
be spoken together.
QRG
Index
Home
TOC
For example, say ...
Categories
