Honda Fit: Transmission End Cover Air Check Valve Inspection and Replacement (A/T)
NOTE:
-
There are two types of the transmission end cover; the type A and the type B; and both types are available.
-
The differences between the types A and B of the end covers are:
-
The installation position of the air check valves.
-
-
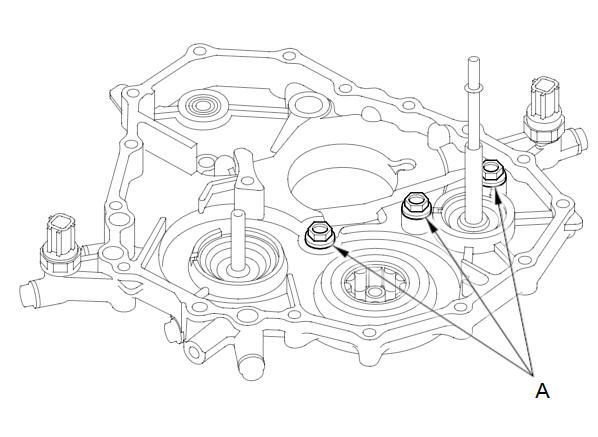
Check the air check valve filter for clogging. If the filter is clogged, remove the air check valves (A), and clean the filter thoroughly by pouring new ATF. Do not blow out the filter with compressed air. If the filter or check valve (ball) is clogged or damaged, replace the air check valve.
NOTE:
-
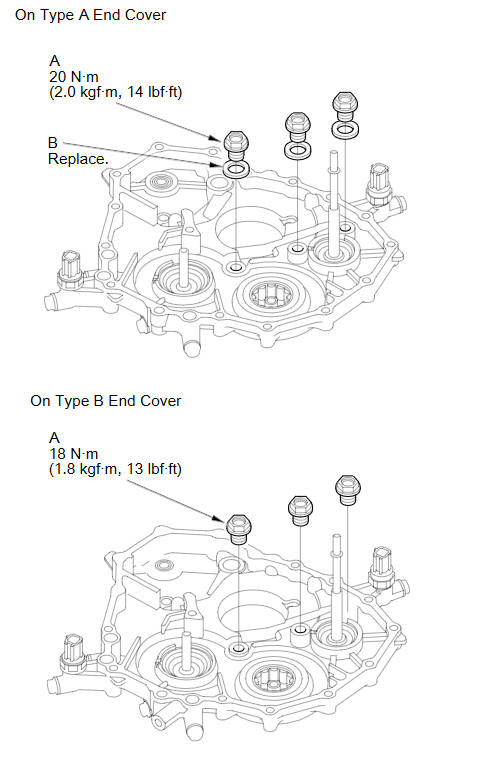
Replace the sealing washer with a new one whenever the air check valve (came with the sealing washer) is removed or replaced.
-
It is no need to install the sealing washer with the air check valve that came without the washer.
-
-
Install the air check valve (A):
-
On type A end cover: Install the air check valve and a new sealing washer (B).
-
On type B end cover: Install the air check valve. Do not install the sealing washer.
-
-
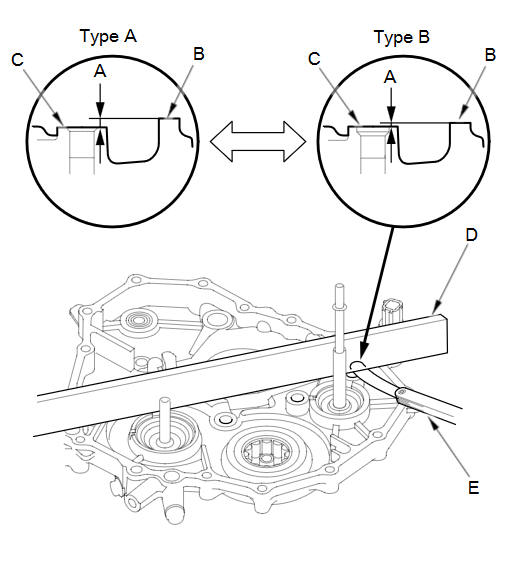
If the classification of the end cover between types A and B is uncertain, measure the clearance (A) between surface (B) of the end cover and installed position (C) of the 2nd check valve with a straight edge (D) and a feeler gauge (E), and determine the end cover of A or B with the measurement.
Measurement
Type A End Cover:
2.00 mm (0.078 in)
Type B End Cover:
0.15 mm (0.005 in)
See also:
DOT Tire Quality Grading (U.S. Vehicles)
The tires on your vehicle meet all U.S. Federal Safety Requirements.
All tires are also graded for treadwear, traction, and temperature performance
according to Department of Transportation (DOT) s ...
Transmission End Cover Park Lever Stop Inspection and Adjustment (A/T)
Set the park lever in the P position.
Measure the center-to-center distance (A) between the park pawl shaft (B)
and the park lever roller pin (C).
Sta ...
If the Malfunction Indicator Lam Comes On or Blinks
■ Reasons for indicator lamp to come on or blink
• Comes on when there is a problem with the engine emissions control
system, or the fuel fill cap is missing, or loose.
• Blinks when en ...
Categories
