Honda Fit: Clutch Pedal, Clutch Pedal Position Switch, and Clutch Interlock Switch Adjustment (M/T)
NOTE:
-
For a cruise control problem, check the clutch pedal position switch.
-
For a clutch interlock operation problem, check the clutch interlock switch.
-
Remove the driver's floor mat before adjusting the clutch pedal.
-
If there is no clearance between the master cylinder piston and the push rod, the release bearing will be held against the diaphragm spring, which can result in clutch slippage or other clutch problems.
-
Without cruise control: The adjusting bolt is substituted as clutch pedal position switch. The clutch pedal height adjustment is same procedure as with the clutch pedal position switch.
-
Disconnect the clutch pedal position switch connector and the clutch interlock switch connector.
-
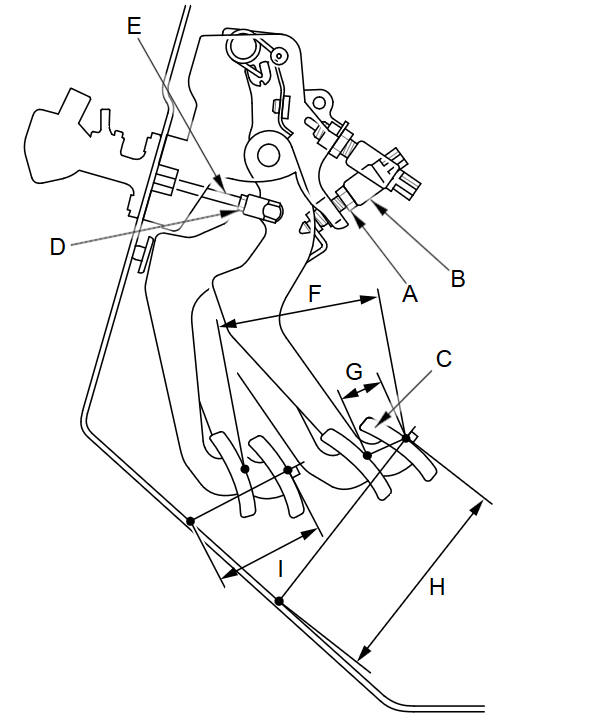
Loosen the clutch pedal position switch locknut (A), and back off the clutch pedal position switch (B) until it no longer touches the clutch pedal (C).
-
Loosen the master cylinder pushrod locknut (D), and turn the pushrod (E). Measure the clutch pedal stroke (F).
(F)
Clutch Pedal Stroke:
120пјЌ130 mm (4.72пјЌ5.12 in)
(G)
Clutch Pedal Free Play (Reference):
4.1пјЌ17.4 mm (0.161пјЌ0.685 in)
(H)
Clutch Pedal Height (Reference):
150 mm (5.91 in)
(I)
Clutch Pedal Disengagement Height (Minimum to the floor) (Reference):
75.7 mm (2.98 in)
-
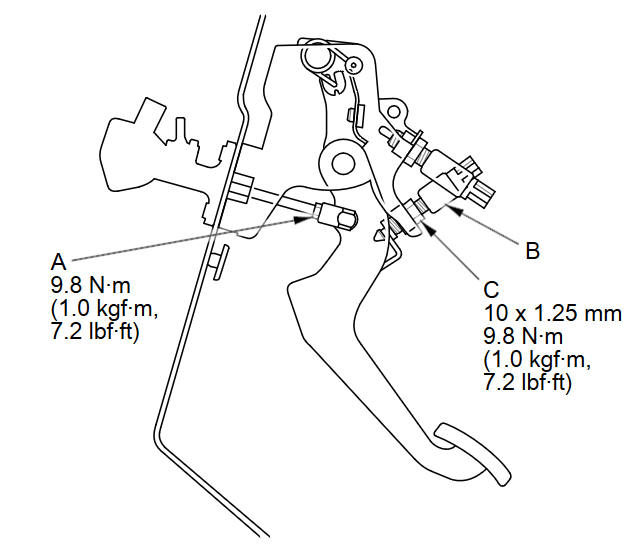
Tighten the master cylinder pushrod locknut (A).
-
With the clutch pedal released, turn in the clutch pedal position switch (B) until it contacts the clutch pedal.
-
Turn in the clutch pedal position switch an additional 3/4 to 1 turn. Make sure the clutch pedal height did not change.
-
While holding the clutch pedal position switch, tighten the locknut (C).
-
Loosen the clutch interlock switch locknut (A).

-
Fully press the clutch pedal to the floor, then release the clutch pedal 9пјЌ12 mm (0.35пјЌ0.47 in) and hold it there.
-
Adjust the position of the clutch interlock switch (B) so the engine starts with the clutch pedal in this position.
-
While holding the clutch interlock switch, tighten the locknut.
-
Check the clutch operation.
-
Connect the clutch pedal position switch connector and the clutch interlock switch connector, then check the cruise control and clutch interlock operation.
See also:
Tailgate Lock Cylinder Replacement
For Some Models
NOTE: Put on gloves to protect your hands.
Remove the tailgate lower trim panal.
Disconnect the tailgate cylinder rod (A).
NOTE: Check for damaged or stress-wh ...
Phone Setup
PHONE button
► Phone Setup
Set HFL options and features.
1. Select an item.
2. Select OK.
The following items are available:
• Bluetooth Setup: Pairs your phone to the system.
• B ...
Steering Rack Guide Adjustment
Special Tools Required
Locknut Wrench, 40 mm 07MAA-SL00100, 07916-SA50001, or 07AAA-TL2A100
Set the wheels in the straight ahead position.
Loosen the rack guide screw locknut ...
Categories
