Honda Fit: Valve Body and ATF Strainer Removal (A/T)
-
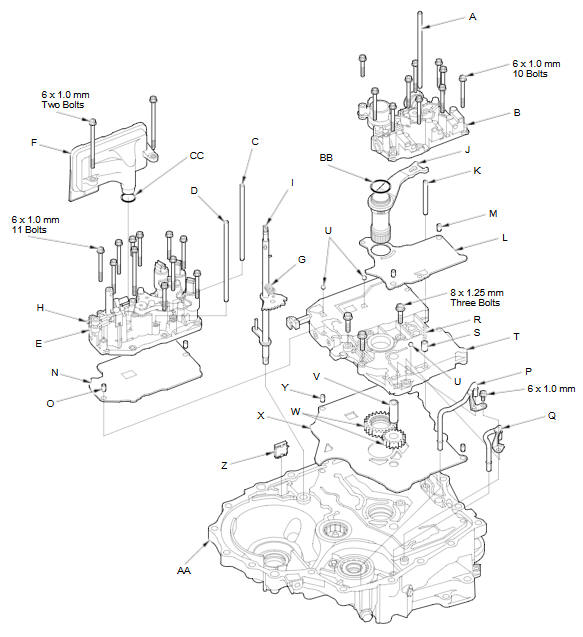
Remove the ATF feed pipe (A) from the regulator valve body (B).
-
Remove the ATF feed pipes (C) (D) from the servo body (E).
-
Remove the ATF strainer (F) (two bolts).
-
Unhook the detent spring (G) from the detent arm (H), and remove the control shaft (I).
-
Remove the regulator valve body (10 bolts).
-
Remove the stator shaft (J) and stator shaft stop (K), then remove the regulator separator plate (L) and two dowel pins (M).
-
Remove the servo body (11 bolts), then remove the separator plate (N) and two dowel pins (O).
-
Remove the ATF joint pipes (P) (Q).
-
Remove the cooler check valve spring (R) and cooler check valve (S), then remove the main valve body (T) (three bolts). Do not let the check balls (U) fall out.
-
Remove the ATF pump driven gear shaft (V), then remove the ATF pump gears (W).
-
Remove the main separator plate (X) and two dowel pins (Y).
-
Remove the ATF magnet (Z), clean and reinstall it in the torque converter housing (AA).
-
Remove the O-ring (BB) from the stator shaft, and remove the O-ring (CC) from the ATF strainer. Install new ones when installing the valve bodies.
-
Clean the inlet opening (A) of the ATF strainer (B) thoroughly with compressed air, then check that it is in good condition and that the inlet opening is not clogged.
-
Test the ATF strainer by pouring clean ATF through the inlet opening, and replace it if it is clogged or damaged.
See also:
Fog Light Bulbs
When replacing, use the following bulbs.
Fog Light: 55 W (H11)
1. Pry on the edge of the cover using a flat-tip
screwdriver to remove the cover.
► Wrap the flat-tip screwdriver with a cl ...
Tailgate Lock Cylinder Replacement
For Some Models
NOTE: Put on gloves to protect your hands.
Remove the tailgate lower trim panal.
Disconnect the tailgate cylinder rod (A).
NOTE: Check for damaged or stress-wh ...
Tailgate Lock Cylinder Replacement
For Some Models
NOTE: Put on gloves to protect your hands.
Remove the tailgate lower trim panal.
Disconnect the tailgate cylinder rod (A).
NOTE: Check for damaged or stress-wh ...
Categories
