Honda Fit: Regulator Valve Body Disassembly, Inspection, and Reassembly (A/T)
-
Clean all parts thoroughly in solvent, and dry them with compressed air. Blow out all passages except the air check valve filter.
-
Inspect the regulator valve body for scoring and damage.
-
Hold the regulator spring cap in place while removing the stop bolt. The regulator spring cap is spring loaded. Once the stop bolt is removed, release the spring cap slowly so it does not pop out.
-
Check all valves for free movement. If any fail to slide freely, refer to valve body repair.
-
Check the air check valve filter for clogging. If the filter is clogged, remove the air check valve, and clean the filter thoroughly by pouring clean ATF. Do not blow out the filter with compressed air. Replace the air check valve, if the filter or the check valve (ball) is clogged or damaged.
-
Coat all parts with ATF during assembly.
-
Align the hole in the regulator spring cap with the stop bolt hole, then press the spring cap into the valve body, and install the stop bolt.
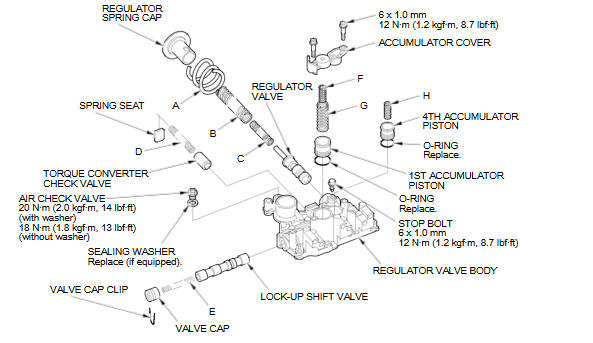
VALVE SPRING SPECIFICATIONS
|
Valve Springs |
Standard (New)-Unit: mm (in) |
||||
|
Wire Diameter |
O.D. |
Free Length |
No. of Coils |
||
|
A |
Stator reaction spring |
4.5 (0.177) |
35.4 (1.394) |
30.3 (1.193) |
1.92 |
|
B |
Regulator valve spring A |
1.9 (0.075) |
14.7 (0.579) |
80.6 (3.173) |
16.1 |
|
C |
Regulator valve spring B |
1.6 (0.063) |
9.2 (0.362) |
44.0 (1.732) |
12.5 |
|
D |
Torque converter check valve spring |
1.2 (0.047) |
8.6 (0.339) |
33.8 (1.331) |
12.2 |
|
E |
Lock-up shift valve spring |
1.0 (0.039) |
6.6 (0.260) |
35.5 (1.398) |
18.2 |
|
F |
1st accumulator spring B |
2.4 (0.094) |
12.2 (0.480) |
35.0 (1.378) |
7.7 |
|
G |
1st accumulator spring A |
2.4 (0.094) |
18.6 (0.732) |
50.1 (1.972) |
6.7 |
|
H |
4th accumulator spring |
2.5 (0.098) |
14.6 (0.575) |
29.9 (1.177) |
4.9 |
See also:
System Controls
...
Breather Line and Suction Line Inspection (Page-1)
Special Tools Required
Fuel Pressure Gauge Attachment Set 07AAJ-S6MA150
Vacuum Pump/Gauge, 0-30 inHg Snap-on YA4000A or equivalent, commercially
available
Vacuum/Pressure Gauge, 0-4 inHg 07 ...
If the Brake System Indicator Comes On
■ Reasons for the indicator to come on
• The brake fluid is low.
• There is a malfunction in the brake system.
■ What to do when the indicator comes on while driving
Press the ...
Categories
