Honda Fit: Main Valve Body Disassembly, Inspection, and Reassembly (A/T)
-
Clean all parts thoroughly in solvent, and dry them with compressed air. Blow out all passages.
-
Do not use a magnet to remove the check balls, it may magnetize the check balls.
-
Inspect the main valve body for scoring and damage.
-
Check all valves for free movement. If any fail to slide freely, refer to valve body repair.
-
Coat all parts with ATF during assembly.
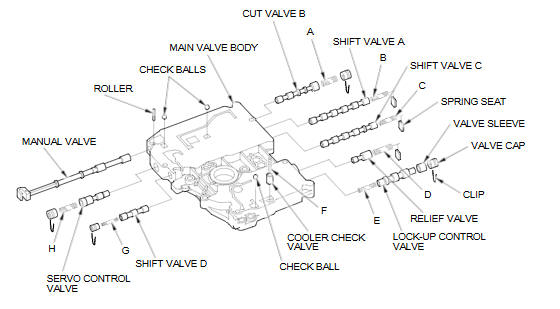
VALVE SPRING SPECIFICATIONS
|
Valve Springs |
Standard (New)-Unit: mm (in) |
||||
|
Wire Diameter |
O.D. |
Free Length |
No. of Coils |
||
|
A |
Cut valve B spring |
0.8 (0.031) |
9.9 (0.390) |
27.3 (1.075) |
8.0 |
|
B |
Shift valve A spring |
0.8 (0.031) |
7.1 (0.280) |
23.7 (0.933) |
9.7 |
|
C |
Shift valve C spring |
0.8 (0.031) |
7.1 (0.280) |
23.7 (0.933) |
9.7 |
|
D |
Relief valve spring |
1.0 (0.039) |
9.6 (0.378) |
34.1 (1.343) |
10.2 |
|
E |
Lock-up control valve spring |
0.6 (0.024) |
7.1 (0.280) |
29.6 (1.165) |
11.2 |
|
F |
Cooler check valve spring |
0.85 (0.033) |
6.6 (0.260) |
27.0 (1.063) |
11.3 |
|
G |
Shift valve D spring |
0.8 (0.031) |
5.6 (0.220) |
28.1 (1.106) |
15.9 |
|
H |
Servo control valve spring |
0.8 (0.031) |
9.9 (0.390) |
27.3 (1.075) |
8.0 |
See also:
Automatic Transmission
■Creeping
The engine may run at a higher idle speed and creeping increases:
• Immediately after the engine starts.
• When the heating and cooling system is in use.
Keep the brake pedal f ...
Clutch Pedal Position Switch Replacement (With Cruise Control(M/T))
Disconnect the 2P connector (A) from the clutch pedal position switch
(B).
Loosen the locknut (C), then remove the clutch pedal position switch.
Install the clutch ...
A/T System Description - Lock-Up System (A/T)
Lock-up SystemThe lock-up mechanism of the torque converter
clutch operates in all five gears in D, in 3rd gear in D3, and 3rd and 4th
gears in S with the automatic shift mode. The pressurize ...
Categories
