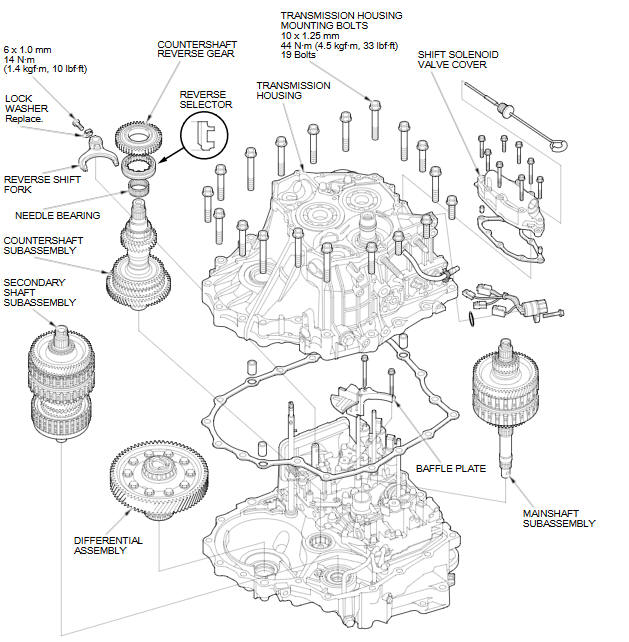
Honda Fit: Shaft Assembly and Housing Installation (A/T)
-
Install the differential assembly in the torque converter housing.
-
Install the baffle plate.
-
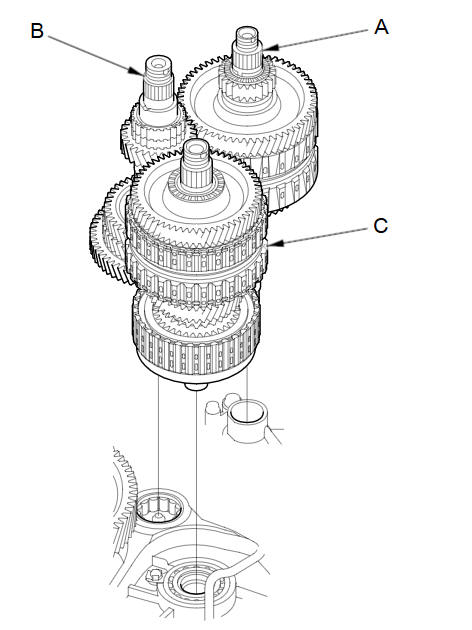
Assemble the mainshaft, the countershaft, and the secondary shaft.
NOTE:
-
If the countershaft reverse selector hub is press-fitted type, go to step 4.
-
If the countershaft reverse selector hub is not press-fitted type, go to step 5.
-
-
Join the mainshaft subassembly (A), the countershaft subassembly (B), and the secondary shaft subassembly (C) together, and install them in the torque converter housing.
-
Join the countershaft subassembly and the secondary shaft subassembly together, then install them in the torque converter housing, and install the mainshaft subassembly. Install the needle bearings, 4th-5th gear, and the reverse selector hub over the countershaft.
-
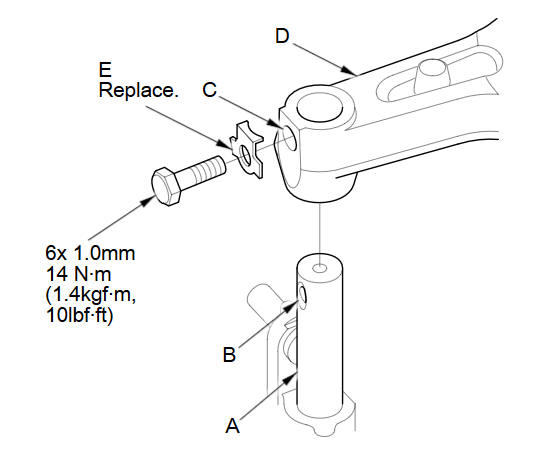
Turn the shift fork shaft (A) so the large chamfered hole (B) is facing the fork bolt hole (C) of the shift fork (D).
-
Install the shift fork and the reverse selector together on the shift fork shaft and the countershaft. Secure the shift fork to the shift fork shaft with the lock bolt and a new lock washer (E), then bend the lock tab of the lock washer against the bolt head.
-
Install the needle bearing and the countershaft reverse gear on the countershaft.
-
Install the reverse idler gear in the transmission housing.
-
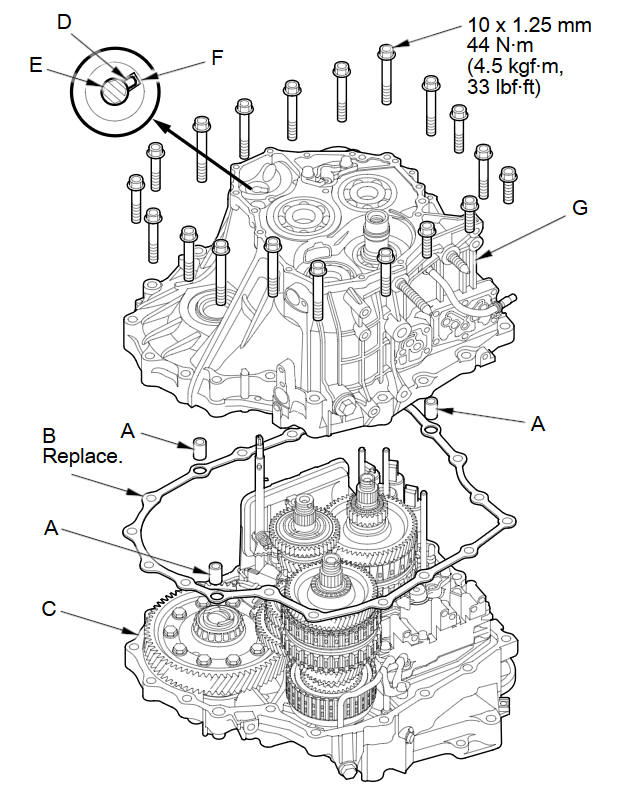
Install the three dowel pins (A) and a new gasket (B) on the torque converter housing (C).
-
Align the spring pin (D) of the control shaft (E) with the transmission housing groove (F) by turning the control shaft detent plate. Do not squeeze the end of the control shaft tips together when turning the shaft. If the tips are squeezed together, it will cause a faulty shift position signal or position due to the play between the control shaft and the switch.
-
Place the transmission housing (G) on the torque converter housing. Do not install the input shaft (mainshaft) speed sensor and the output shaft (countershaft) speed sensor before installing the transmission housing on the torque converter housing.
-
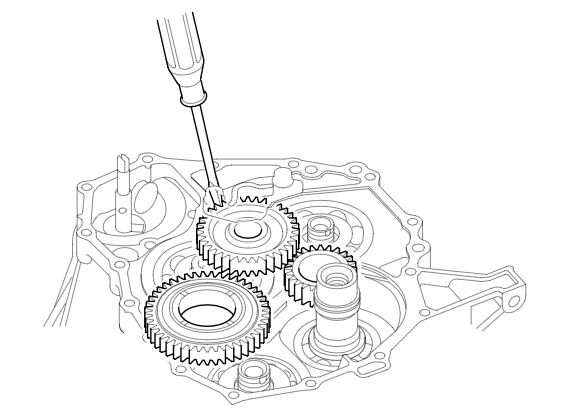
Wrap a screwdriver tip with tape to prevent damage to the reverse idler gear teeth. Engage the reverse idler gear with reverse gears by rotating the idler gear using the screwdriver.
-
Install the transmission housing mounting bolts, and tighten the bolts to 44 NВ·m (4.5 kgfВ·m, 33 lbfВ·ft) in at least two steps in a crisscross pattern.
-
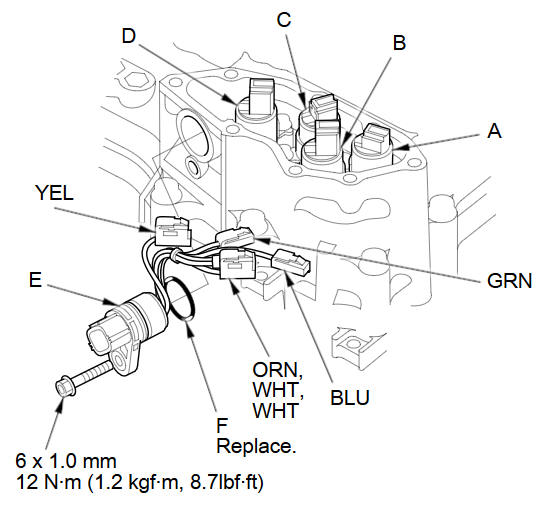
Install the shift solenoid harness connector (E) in the transmission housing with a new O-ring (F).
-
Connect the WHT and ORN wires connector to shift solenoid valve B. The ATF temperature sensor is assembled in the WHT wires connector.
-
Connect the harness terminals to the solenoids:
-
BLU wire connector to shift solenoid valve A.
-
GRN wire connector to shift solenoid valve C.
-
YEL wire connector to shift solenoid valve D.
-
-
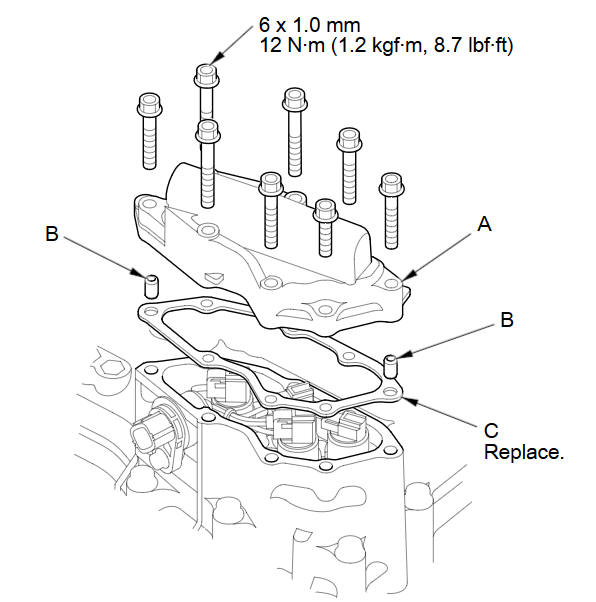
Install the shift solenoid valve cover (A), the two dowel pins (B), and a new gasket (C).
-
Install the ATF dipstick.
See also:
Torque Converter Housing Mainshaft Bearing and Oil Seal Replacement (A/T)
Special Tools Required
Adjustable Bearing Puller, 25пјЌ40 mm 07736-A01000B
Driver Handle, 15 x 135L 07749-0010000
Bearing Driver Attachment, 62 x 68 mm 07746-0010500
Bearing Driver Attachme ...
Transmission Housing Bearing Installation (A/T)
Special Tools Required
Bearing Driver Attachment, 72 x 75 mm 07746-0010600
Bearing Driver Attachment, 78 x 80 mm 07NAD-PX40100
Bearing Driver Attachment, 62 x 68 mm 07746-0010500
Driver Handle ...
USB Commands
USB play
USB play track # (#: 1 to 30)
USB skip forward
USB skip back
USB track random*
USB track repeat*
USB track scan*
USB folder up
USB folder down
USB folder random*
USB folder repeat*
...
Categories
