Honda Fit: Installation
-
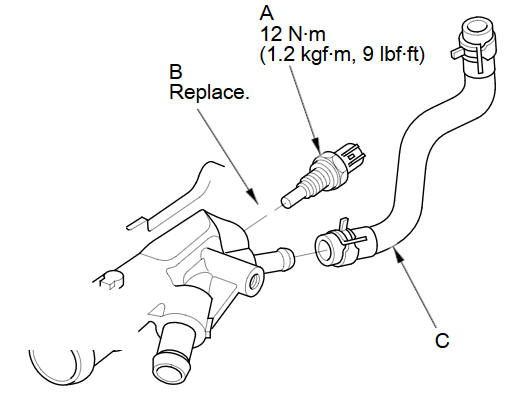
Install ECT sensor 1 (A) with a new O-ring (B).
-
Install the water bypass hose (C).
-
Remove all of the old liquid gasket from the water outlet mating surfaces, the bolts, and the bolt holes.
-
Clean and dry the water outlet mating surfaces.
-
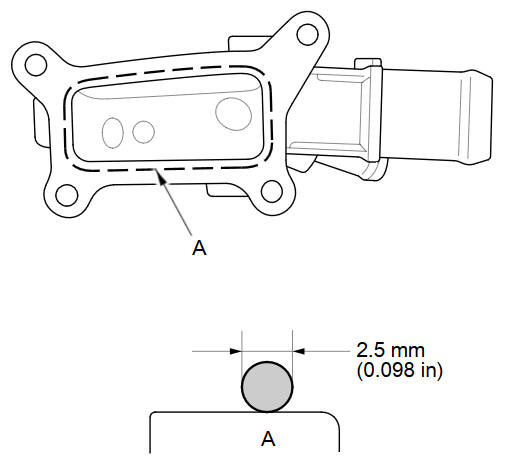
Apply liquid gasket (P/N 08717-0004, 08718-0003, 08718-0004, or 08718-0009) to the cylinder head mating surface of the water outlet and to the inside edge of the threaded bolts holes. Install the component within 5 minutes of applying the liquid gasket.
NOTE:
-
Apply a 2.5 mm (0.098 in) diameter dead of liquid gasket along the broken line (A).
-
If you apply liquid gasket P/N 08718-0012, the component must be installed within 4 minutes.
-
If too much time has passed after applying the liquid gasket, remove the old liquid gasket and residue, then reapply new liquid gasket.
-
-
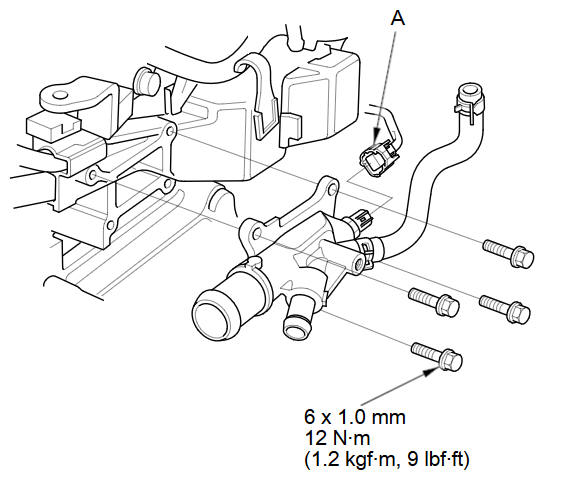
Install the water outlet, then connect the ECT sensor 1 connector (A).
NOTE:
-
After assembly, wait at least 30 minutes before filling the engine with coolant.
-
Do not run the engine for at least 3 hours after installing the water outlet.
-
-
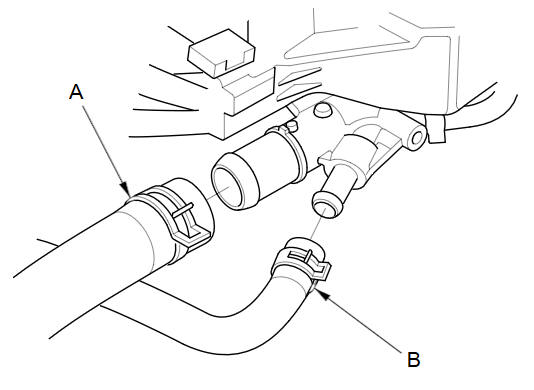
Connect the upper radiator hose (A) and the heater hose (B).
-
Install the harness holder (A) to the bracket, then tighten the harness holder mounting bolt (B) and the heater hose clamp bracket mounting bolt (C).

-
Connect the water bypass hose (D).
-
Install the air cleaner.
-
Refill the radiator with engine coolant, and bleed the air from the cooling system.
-
Clean up any spilled engine coolant.
See also:
Playing the FM/AM Radio
■Radio Data System (RDS)
Provides text data information related to your selected RDS capable FM
station.
■ RDS INFO ON
Press the TITLE button while listening to an RDS capable stati ...
Intermediate Shaft Reassembly (A/T)
Exploded View
Special Tools Required
Oil Seal Driver, 65 mm 07JAD-PL90100
Bearing Driver Attachment, 52 x 55 mm 07746-0010400
Bearing Driver Attachment, 35 mm I.D. 07746-0030400
Drive ...
Audio Menu
AUDIO button (in FM/AM mode)
►AUDIO MENU
Select an item.
The following items are available:
• RDS search: Searches for programs by RDS category.
• Radio Text: Displays the text infor ...
Categories
