Honda Fit: Adding Waypoints
Add up to four waypoints (pit stops) along the route to your destination.
Waypoints allow you to stop for gas or food, for example, and then continue on to your destination.
Press the MAP/GUIDE button to return to the map screen without adding a waypoint at any time.
The search corridor used for adding waypoints can be adjusted.
You can delete waypoints or edit the order of waypoints in the destination list.
Adding Waypoints from the Route Menu
 DEST button (when en route)
►Waypoint
1. Select a search method to add a waypoint.
The following items are available:
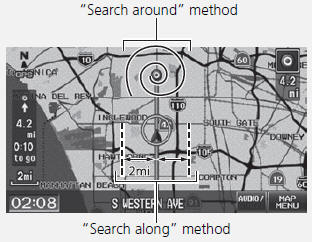
• Places Along the Route:
Searches within a “corridor” on either side of the route.
• Places Around the Destination:
Searches in a spiral pattern around the destination.
• Places Around the Waypoint:
Searches in a spiral pattern around the location you select.
2. Select the location when you select Places Around the Waypoint.
Search method
The search corridor used for adding waypoints can be adjusted.
3. Select a waypoint category (e.g., Auto Service).
4. Select a waypoint subcategory (e.g., GAS STATION).

5. Select a place.
► The waypoint is added to the destination list.
► The route is automatically recalculated and displayed on the map screen.
Adding Waypoints from the Calculate Route Screen
1. Select a new address or location.
2. Select ADD TO My Dest.
3. Select  or
or
 to select a location
in the destination list. Select OK.
4. Select OK.
► The route is automatically recalculated and displayed on the map screen.
See also:
Synchro Sleeve and Hub Inspection and Reassembly (M/T)
Inspect gear teeth on all synchro hubs and the synchro sleeves for
rounded off corners, which indicate wear.
Install each synchro hub (A) in its mating synchro sleeve (B), and che ...
Temporarily Repairing a Flat Tire
Canadian models with automatic transmission
If the tire has a large cut or is otherwise severely damaged, you will need
to have the
vehicle towed. If the tire only has a small puncture, from a nai ...
Inboard Joint Side
Remove the boot bands. Be careful not to damage the boot.
If the boot band is welded type (A), cut the boot band.
If the boot band is a double loop type (B), lift up the ban ...
Categories
