Honda Fit: Coolant Replacement
-
Wait until the engine is cool, then carefully remove the radiator cap.
-
Remove the splash shield.
-
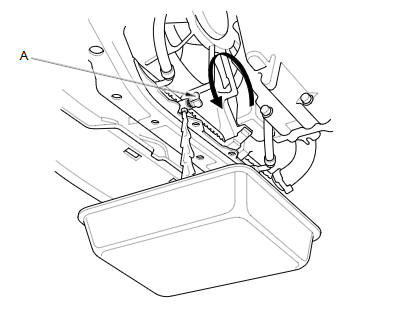
Loosen the drain plug (A), and drain the coolant.
-
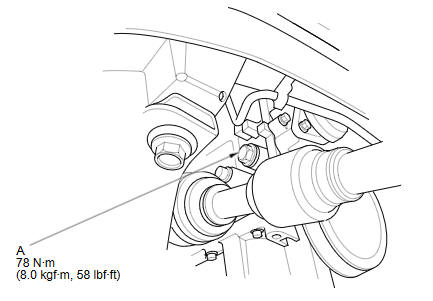
Remove the drain bolt (A) located at the rear of the engine block.
-
After the coolant has drained, reinstall the drain bolt with a new washer.
-
Tighten the radiator drain plug securely.
-
Remove, drain, and reinstall the coolant reservoir.
-
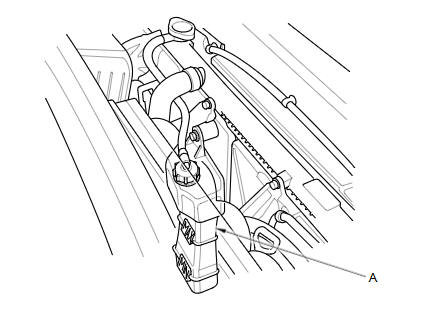
Fill the coolant reservoir to the MAX mark (A) with Honda Long Life Antifreeze/Coolant Type 2 .
-
Follow the chart and pour coolant into the radiator up to the base of the filler neck.
NOTE:
-
Use Honda Long Life Antifreeze/Coolant Type 2, and if necessary add Honda Extreme Cold Weather Antifreeze/Coolant Type 2 (concentrate). Using a non-Honda coolant can result in corrosion, causing the cooling system to malfunction or fail.
-
Honda Long Life Antifreeze/Coolant Type 2 is a mixture of 50 % antifreeze and 50 % water. Honda Extreme Cold Weather Antifreeze/Coolant Type 2 is a 100 % concentration coolant. Do not add water to either coolant.
-
If the vehicle is regularly driven in very low temperatures (below -22 °F (-30 °C)), a 60 % concentration of coolant should be used.
Operation
Vehicle Usage (Desired Mixture)
Current Mixture
Coolant Drain
Add Amount of Honda Extreme Cold Weather Antifreeze/Coolant Type 2 (100% concentrate)
Then add Honda Long Life Antifreeze/Coolant Type 2 (50/50)
*: When you want to winterize the coolant with the minimum amount of coolant change but the current coolant concentration in the vehicle is unknown, you must drain all coolant from the cooling system.
Coolant Change
Normal Area (50/50)
50/50
60/40
unknownDrain radiator and reservoir
None
Top off the cooling system
Very Cold Area (60/40)
50/50
unknownDrain radiator and reservoir
About 1.0 L (34 fl oz)
60/40
About 0.9 L (30 fl oz)
Engine Overhaul
Normal Area (50/50)
-
-
None
Very Cold Area (60/40)
-
-
About 1.0 L (34 fl oz)
Coolant Winterizing
Very Cold Area (60/40)
50/50
Drain about 2.0 L (68 fl oz) from radiator
About 1.0 L (34 fl oz)
unknown*
Drain radiator and reservoir
Engine Coolant Capacities (Including the coolant reservoir capacity of 0.44 L (0.116 US gal)):
M/T model
At Coolant Change:
4.37 L (1.154 US gal)
After Engine Overhaul:
4.86 L (1.284 US gal)
A/T model
At Coolant Change:
4.47 L (1.181 US gal)
After Engine Overhaul:
4.96 L (1.310 US gal)
-
-
Loosely install the radiator cap.
-
Start the engine, and let it run until it warms up (the radiator fan comes on at least twice).
-
Turn off the engine. Check the level in the radiator, and add the recommended coolant, if needed.
-
Put the radiator cap on tightly, then start the engine again, and check for leaks.
-
Clean up any spilled engine coolant.
-
If the Maintenance Minder required engine coolant replacement, reset the Maintenance Minder, and this procedure is complete. If the Maintenance Minder did not require engine coolant replacement, go to step 16.
-
Turn the ignition switch to LOCK (0).
-
Connect the HDS to the DLC.
-
Turn the ignition switch to ON (II).
-
Make sure the HDS communicates with the vehicle and the ECM/PCM. If it does not communicate, troubleshoot the DLC circuit.
-
Select GAUGES in the BODY ELECTRICAL with the HDS.
-
Select ADJUSTMENT in the GAUGE with the HDS.
-
Select MAINTENANCE MINDER in the ADJUSTMENT with the HDS.
-
Select RESET in the MAINTENANCE MINDER with the HDS.
-
Select MAINTENANCE SUB ITEM 5 RESET with the HDS.
See also:
Rear Seat Removal/Installation
NOTE:
Put on gloves to protect your hands.
Take care not to scratch the trim and panels.
Have an assistant help you when removing and installing the rear seat.
Lift ...
Tailgate Adjustment
NOTE:
Have an assistant help you when adjusting the tailgate.
Take care not to scratch the tailgate, the body or other related parts.
Put on gloves to protect your hands.
...
Using the Phonebook
PHONE button
► Phonebook
1. Select a name.
Select alphabetical tabs to
display the entries in the group.
2. Select a number.
3. Select Call to begin dialing.
Up to three icons ...
Categories
