Honda Fit: Fuel Pressure Regulator Replacement
-
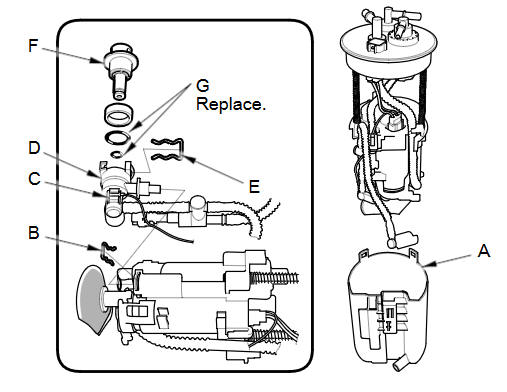
Remove the fuel tank unit.
-
Remove the reservoir (A).
-
Remove the clip (B) and the ground wire (C), then remove the bracket (D).
-
Remove the clip (E), then remove the fuel pressure regulator (F).
-
Install the parts in the reverse order of removal with new O-rings (G) and a new bracket. When installing the fuel tank unit, align the marks on the unit and the fuel tank.
NOTE:
-
Coat the O-rings with clean engine oil; do not use any other oils or fluids.
-
Do not pinch the O-rings during installation.
-
Use all the new parts supplied in the pressure regulator replacement kit.
-
See also:
ABS (Anti-lock Brake System)
NOTICE
The ABS may not function correctly if you use an
incorrect tire type and size.
When the ABS indicator comes on while driving,
there may be a problem with the system.
While normal braki ...
Steering Gearbox Removal and Installation
Special Tools Required
Ball Joint Thread Protector, 14 mm 071AF-S3VA000
Ball Joint Thread Protector, 10 mm 07AAF-SECA120
Universal Lifting Eyelet 07AAK-SNAA120
1.8 Support Bolt 07AAK-SNAA500 ...
Categories
