Honda Fit: Jump Starting
■Jump Starting Procedure
Turn off the power to electric devices, such as audio and lights. Turn off the engine, then open the hood.
1. Connect the first jumper cable to your vehicle’s battery + terminal.
► Remove the cover from the under-hood fuse box.
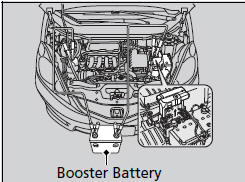
2. Connect the other end of the first jumper cable to the assisting vehicle’s + terminal.
► Use a 12-volt booster battery only.
3. Connect the second jumper cable to the assisting vehicle’s - terminal.
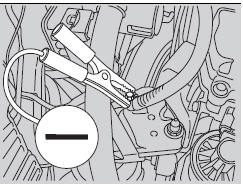
4. Connect the other end of the second jumper cable to the grounding strap as shown.
Do not connect this jumper cable to any other part.
5. If your vehicle is connected to another vehicle, start the assisting vehicle’s engine and increase its rpm slightly.
6. Attempt to start your vehicle’s engine. If it turns over slowly, check that the jumper cables have good metal-to-metal contact.
WARNING
A battery can explode if you do not follow
the correct procedure, seriously injuring
anyone nearby.
Keep all sparks, open flames, and smoking materials away from the battery.
Securely attach the jumper cables clips so that they do not come off when the engine vibrates. Also be careful not to tangle the jumper cables or allow the cable ends to touch each other while attaching or detaching the jumper cables.
Battery performance degrades in cold conditions and may prevent the engine from starting.
■What to Do After the Engine Starts
Once your vehicle’s engine has started, remove the jumper cables in the following order.
1. Disconnect the jumper cable from your vehicle’s ground.
2. Disconnect the other end of the jumper cable from the assisting vehicle’s battery - terminal.
3. Disconnect the jumper cable from your vehicle’s battery + terminal.
4. Disconnect the other end of the jumper cable from the assisting vehicle’s battery + terminal.
Have your vehicle inspected by a nearby service station or a dealer.
See also:
Steering Rack Guide Adjustment
Special Tools Required
Locknut Wrench, 40 mm 07MAA-SL00100, 07916-SA50001, or 07AAA-TL2A100
Set the wheels in the straight ahead position.
Loosen the rack guide screw locknut ...
EVAP Canister Vent Shut Valve Replacement
Remove the EVAP canister assembly.
Remove the hose (A), and disconnect the EVAP canister vent shut valve
connector (B).
Remove the EVAP canister vent shut valv ...
Wheel Bearing Replacement
Separate the hub (A) from the knuckle (B) using the hub dis/assembly tool
and a hydraulic press. Hold the knuckle with the attachment (C) of the
hydraulic press or equivalent tool. Be care ...
Categories
