Honda Fit: Changing the Engine Oil and Oil Filter
You must change the engine oil and oil filter regularly in order to maintain the engine’s lubrication. The engine may be damaged if they are not changed regularly.
Change the oil and filter in accordance with the Maintenance Minder message on the information display.
1. Run the engine until it reaches normal operating temperature, and then turn the engine off.
2. Open the hood and remove the engine oil fill cap.
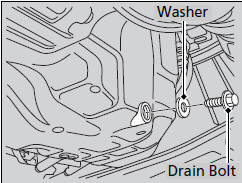
3. Remove the drain bolt and washer from the bottom of the engine, and drain the oil into a suitable container.
NOTICE
You may damage the environment if you do not dispose of the oil in a suitable way. If you are changing the oil by yourself, appropriately dispose of the used oil. Put the oil in a sealed container and take it to a recycling center. Do not throw the oil away into a garbage can or onto the ground.

4. Remove the oil filter and dispose of the remaining oil.
5. Check that the filter gasket is not stuck to the engine contact surface.
► If it is stuck, you must detach it.
6. Wipe away dirt and dust adhering to the contact surface of the engine block, and install a new oil filter.
► Apply a light coat of new engine oil to the oil filter rubber seal.
7. Put a new washer on the drain bolt, then reinstall the drain bolt.
► Tightening torque: 29 lbf∙ft (39 N∙m, 4.0 kgf∙m) 8. Pour the recommended engine oil into the engine.
► Engine oil change capacity (including
filter):
3.8 US qt (3.6 L)
9. Reinstall the engine oil fill cap securely and
start the engine.
10. Run the engine for a few minutes, and then check that there is no leak from the drain bolt or oil filter.
11. Stop the engine, wait for three minutes, and then check the oil level on the dipstick.
► If necessary, add more engine oil.
You will need a special wrench to replace the oil filter. You can buy this wrench from a dealer.
When installing the new oil filter, follow the instructions supplied with the oil filter.
Reinstall the engine oil fill cap. Start the engine. The low oil pressure indicator should go off within five seconds. If it does not, turn off the engine, and check your work.
See also:
Entering a Destination
DEST button
This section describes how to enter a destination for route guidance.
Select an item.
Select DEST Menu 2 to display
additional menu entries.
The following items are avail ...
Mirror Housing Cover Replacement
Remove the mirror holder.
From the mirror holder opening, release the tabs (A) of the mirror
housing cover (B).
@font-face{font-family:
"Ho ...
PIN Numbers
INFO button
► Setup
►Personal Information►PIN Number
Set a 4-digit PIN for protecting personal addresses and your home addresses.
Once
you set a PIN, you are prompted to ente ...
Categories
