Honda Fit: Main Valve Body Disassembly, Inspection, and Reassembly (A/T)
-
Clean all parts thoroughly in solvent, and dry them with compressed air. Blow out all passages.
-
Do not use a magnet to remove the check balls, it may magnetize the check balls.
-
Inspect the main valve body for scoring and damage.
-
Check all valves for free movement. If any fail to slide freely, refer to valve body repair.
-
Coat all parts with ATF during assembly.
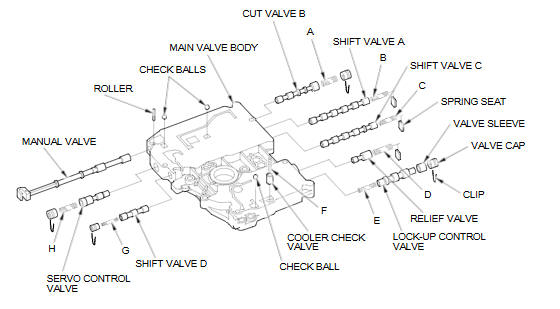
VALVE SPRING SPECIFICATIONS
|
Valve Springs |
Standard (New)-Unit: mm (in) |
||||
|
Wire Diameter |
O.D. |
Free Length |
No. of Coils |
||
|
A |
Cut valve B spring |
0.8 (0.031) |
9.9 (0.390) |
27.3 (1.075) |
8.0 |
|
B |
Shift valve A spring |
0.8 (0.031) |
7.1 (0.280) |
23.7 (0.933) |
9.7 |
|
C |
Shift valve C spring |
0.8 (0.031) |
7.1 (0.280) |
23.7 (0.933) |
9.7 |
|
D |
Relief valve spring |
1.0 (0.039) |
9.6 (0.378) |
34.1 (1.343) |
10.2 |
|
E |
Lock-up control valve spring |
0.6 (0.024) |
7.1 (0.280) |
29.6 (1.165) |
11.2 |
|
F |
Cooler check valve spring |
0.85 (0.033) |
6.6 (0.260) |
27.0 (1.063) |
11.3 |
|
G |
Shift valve D spring |
0.8 (0.031) |
5.6 (0.220) |
28.1 (1.106) |
15.9 |
|
H |
Servo control valve spring |
0.8 (0.031) |
9.9 (0.390) |
27.3 (1.075) |
8.0 |
See also:
Setting the Clock
Press and hold the CLOCK (SOUND) button until you hear a beep. The displayed
time begins to blink. Change the hours by pressing the H (preset 4) button until
the numbers advance to the desired tim ...
Parking Brake Inspection and Adjustment
Inspection
Pull the parking brake lever (A) with 196 N (20 kgf, 44.1 lbf)
of force to fully apply the parking brake. The parking brake lever should be
locked within the specif ...
Accessories and Modifications
WARNING
Improper accessories or modifications can
affect your vehicle’s handling, stability, and
performance, and cause a crash in which
you can be seriously hurt or killed.
Follow all instru ...
Categories
