Honda Fit: Fuel Pressure Regulator Replacement
-
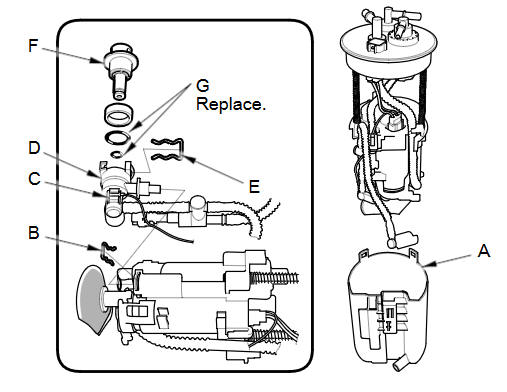
Remove the fuel tank unit.
-
Remove the reservoir (A).
-
Remove the clip (B) and the ground wire (C), then remove the bracket (D).
-
Remove the clip (E), then remove the fuel pressure regulator (F).
-
Install the parts in the reverse order of removal with new O-rings (G) and a new bracket. When installing the fuel tank unit, align the marks on the unit and the fuel tank.
NOTE:
-
Coat the O-rings with clean engine oil; do not use any other oils or fluids.
-
Do not pinch the O-rings during installation.
-
Use all the new parts supplied in the pressure regulator replacement kit.
-
See also:
Drive Belt Auto-Tensioner Inspection
Turn the ignition switch to ON (II), and make sure to turn the A/C switch
OFF, then turn the ignition switch to LOCK (0).
Check the position of the auto-tensioner indicator (A). S ...
Remote Transmitter
On Sport model
LOCK - Press this button once to lock all doors and the tailgate. Some
exterior lights will flash once. When you push LOCK twice within 5 seconds, the
horn will sound to verify t ...
Connecting rod Specification(s)
Connecting rod
Item
Measurement
Qualification
Standard or New
Service Limit
Connecting ...
Categories
