Honda Fit: Engine Coolant
Specified coolant: Honda Long Life Antifreeze/Coolant Type 2
This coolant is premixed with 50% antifreeze and 50% water. Do not add any straight antifreeze or water.
We recommend you check the engine coolant level every time you refuel. Check the reserve tank first. If it is completely empty, also check the coolant level in the radiator. Add the engine coolant accordingly.
NOTICE
If Honda antifreeze/coolant is not available, you may use another major brand non-silicate coolant as a temporary replacement. Check that it is a high quality coolant recommended for aluminum engines.
Continued use of any non-Honda coolant can result in corrosion, causing the cooling system to malfunction or fail. Have the cooling system flushed and refilled with Honda antifreeze/coolant as soon as possible.
Do not add rust inhibitors or other additives to your vehicle’s coolant system. They may not be compatible with the coolant or with the engine components.
If temperatures consistently below -22°F (-30°C) are expected, the coolant mixture should be changed to a higher concentration. Consult a dealer for more information.
Reserve Tank

1. Check the amount of coolant in the reserve tank.
2. If the coolant level is below the MIN mark, add the specified coolant until it reaches the MAX mark.
3. Inspect the cooling system for leaks.
Radiator
1. Make sure the engine and radiator are cool.
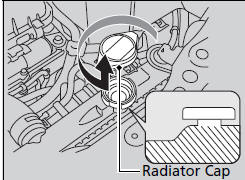
2. Turn the radiator cap counterclockwise and relieve any pressure in the coolant system.
Do not push the cap down when turning.
3. Push down and turn the radiator cap counterclockwise to remove it.
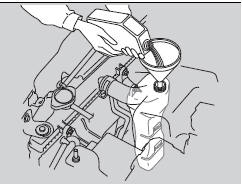
4. The coolant level should be up to the base of the filler neck. Add coolant if it is low.
5. Put the radiator cap back on, and tighten it fully.
6. Pour coolant into the reserve tank until it reaches the MAX mark. Put the cap back on the reserve tank.
WARNING
Removing the radiator cap while the
engine is hot can cause the coolant to spray
out, seriously scalding you.
Always let the engine and radiator cool down before removing the radiator cap.
NOTICE
Pour the fluid slowly and carefully so you do not spill any. Clean up any spills immediately; they can damage components in the engine compartment.
See also:
Instrument Panel
* : If equipped ...
A/T System Description - Hydraulic Controls (A/T)
Hydraulic ControlsThe valve body includes the main valve body,
the regulator valve body, and the servo body. The ATF pump is driven by
splines on the end of the torque converter which is atta ...
Breather Line and Suction Line Inspection (Page-2)
Attach the fuel pressure gauge attachment. Then connect the vacuum pump/gauge
(A) to the suction line (B), and apply vacuum to the line:
If the line holds vacuum, check for a blocka ...
Categories
