Honda Fit: Temporarily Repairing a Flat Tire
Canadian models with automatic transmission
If the tire has a large cut or is otherwise severely damaged, you will need to have the vehicle towed. If the tire only has a small puncture, from a nail for instance, you can use the tire repair kit so that you can drive to the nearest service station for a more permanent repair.
If a tire goes flat while driving, grasp the steering wheel firmly, and brake gradually to reduce speed. Then stop in a safe place.
1. Park the vehicle on firm, level, and non-slippery ground.
2. Put the shift lever in  .
.
3. Set the parking brake.
4. Turn on the hazard warning lights and turn the ignition switch to LOCK ( .
.
The kit should not be used in the following situations.
Instead, contact a dealer or a roadside assistant to have the vehicle towed.
• The tire sealant has expired.
• More than two tires are punctured.
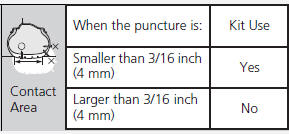
• The puncture is greater than 3/16 inch (4 mm) in diameter.
• The tire side wall is damaged or the puncture is outside the tire tread.
• Damage has been caused by driving with the tires extremely under inflated.
• The tire bead is no longer seated.
• A rim is damaged.
Do not remove a nail or screw that punctured the tire. If you remove it from the tire, you may not be able to repair the puncture using the kit.
NOTICE
Do not use a puncture-repairing agent other than the one provided in the kit that came with your vehicle. If used, you may permanently damage the tire pressure sensor.
Getting Ready to Temporarily Repair the Flat Tire
Injecting Sealant and Air
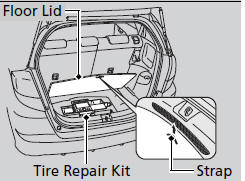
1. Pull up the strap and open the cargo area floor lid.
2. Take the kit out of the case.
► Place the kit on flat ground near the flat tire, away from traffic.
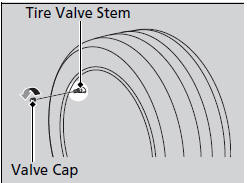
3. Remove the valve cap from the tire valve stem.

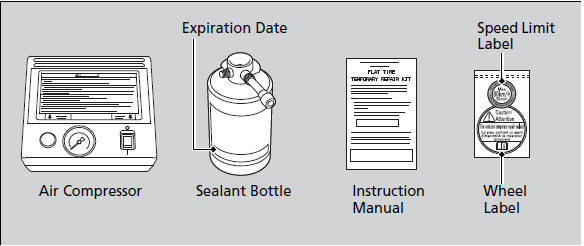
4. Shake the sealant bottle.
5. Attach the sealant/air hose onto the tire valve stem. Screw it until it is tight.
► Make sure the bottle remains upright to ensure all of the sealant flows into the tire.
When making a temporary repair, carefully read the handling manual provided with the kit.
In cold temperatures, the sealant may not flow easily.
In this situation, warm it up for five minutes before using.
The sealant is latex based and can permanently stain clothing and other materials. Be careful during handling and wipe up any spills immediately.
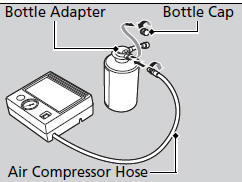
6. Remove the bottle cap from the bottle adapter.
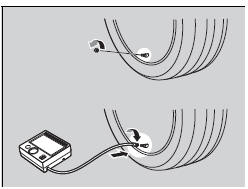
7. Attach the air compressor hose onto the bottle adapter. Screw it until it is tight.
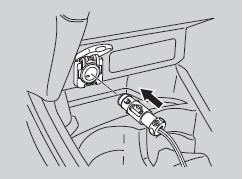
8. Plug in the compressor to the accessory power socket. Be careful not to pinch the cord in a door or window.
9. Turn the ignition switch to
ACCESSORY
 .
.
► In freezing temperatures, start the
engine on and leave it running while
the flat tire is being serviced.
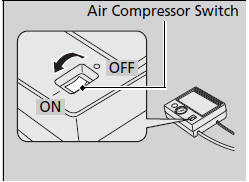
10. Turn the air compressor on to inflate ► The compressor starts injecting sealant and air into the tire.
11. Inflate the tire.
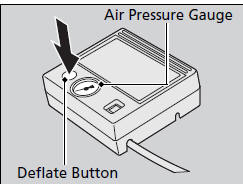
12. After the air pressure reaches to 33 psi (230 kPa), turn off the kit.
► Check the air pressure gauge on the air compressor.
NOTICE
Operating the pump for more than 15 minutes may cause it to overheat and become permanently damaged.
WARNING
Running the engine with the vehicle in an
enclosed or even partly enclosed area can
cause a rapid build-up of toxic carbon
monoxide.
Breathing this colorless, odorless gas can cause unconsciousness and even death.
Only run the engine to power the air compressor with the vehicle outdoors.
Until the sealant injection is complete, the pressure shown on the pressure gauge will appear higher than actual. After the sealant injection is complete the pressure will drop and then begin to rise again as the tire is inflated with air. This is normal. To accurately measure the air pressure using the gauge, turn the air compressor off only after the sealant injection is complete.
13. Unscrew the sealant/air hose from the tire valve stem. Reinstall the valve cap.
14. Push the deflate button until the gauge returns 0 psi.
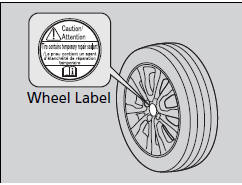
15. Apply the wheel label to the flat surface of the wheel.
► The wheel surface must be clean to ensure the label adheres properly.
If the required air pressure is not reached within 15 minutes, the tire may be too severely damaged for the kit to provide the necessary seal and your vehicle will need to be towed.
Keep the empty bottle after the sealant is injected.
The sealant bottle will be used to collect the injected sealant by a professional.
Distributing the Sealant in the Tire
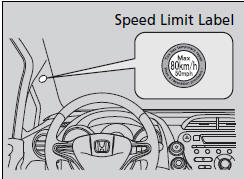
1. Apply the speed limit label to the location as shown.
2. Drive the vehicle for about 5 minutes.
► Do not exceed 50 mph (80 km/h).
3. Stop the vehicle in a safe place.
Stop and recheck the air pressure after every 5 minutes of driving as necessary until you reach the nearest service station where you should have the tire permanently repaired or replaced.
4. Recheck the air pressure using the gauge on the air compressor.
► Do not turn the air compressor on to check the pressure.
If the air pressure is: ► Less than 19 psi (130 kPa), do not add air or continue driving. The leak is too severe. Call for help and have your vehicle towed.
► 33 psi (230 kPa) or more, continue driving for another 5 minutes or until you reach the nearest service station. Do not exceed 50 mph (80 km/h).
► Greater than 19 psi (130 kPa), but less than 33 psi (230 kPa), add air using the pump until the tire pressure reaches 33 psi (230 kPa), then drive carefully for 5 more minutes or until you reach the nearest service station. Do not exceed 50 mph (80 km/h).
5. Repackage and properly stow the kit.
See also:
Disassembly
Raise and support the vehicle.
Remove the rear wheels.
Release the parking brake, and
remove the brake drum.
Remove the tension pins (A) by pushing respe ...
Transmission Mount Replacement
Do the battery removal procedure.
Remove the air cleaner.
M/T model: Remove the battery cables (A) from the battery terminal fuse
box.
M/T mode ...
Accelerator Pedal Module Removal/Installation
Remove the driver's dashboard lower cover.
Disconnect the APP sensor connector (A).
Remove the accelerator pedal module (B).
NOTE:
The APP sensor ...
Categories
