
Honda Fit: Exterior Care
Dust off the vehicle body after you drive.
Regularly inspect your vehicle for scratches on painted surfaces. A scratch on a painted surface can result in body rust. If you find a scratch, promptly repair it.
Washing the Vehicle
Wash the vehicle regularly. Wash more frequently when driving in the
following
conditions:
• If driving on roads with road salt.
• If driving in coastal areas.
• If tar, soot, bird droppings, insects, or tree sap are stuck to painted surfaces.
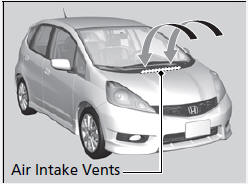
Do not spray water into the air intake vents or engine compartment. It can cause a malfunction.
Using an Automated Vehicle Wash
• Remove the audio antenna.
• Fold in the door mirrors.
Make sure to follow the instructions indicated on the automated vehicle wash.
Using High Pressure Cleaners
• Keep sufficient distance between the cleaning nozzle and the vehicle body.
• Take particular care around the windows. Standing too close may cause water to enter the vehicle interior. Do not spray water into the engine compartment
Applying Wax
A good coat of automotive body wax helps protect your vehicle’s paint from the elements. Wax will wear off over time and expose your vehicle’s paint to the elements, so reapply as necessary.
NOTICE
Chemical solvents and strong cleaners can damage the paint, metal, and plastic on your vehicle. Wipe up spills immediately.
Maintaining the Bumpers and Other Resin Coated Parts
If you get gasoline, oil, engine coolant, or battery fluid on resin coated parts, they may be stained or the coating may peel. Promptly wipe it away using a soft cloth and clean water.
Ask a dealer about the correct coating material when you want to repair the painted surface of the parts made of resin.
Cleaning the Window
Wipe using a glass cleaner.
Wires are mounted to the inside of the rear window.
Wipe along the same direction as the wires with a soft cloth so as not to damage them.
Maintaining Aluminum Wheels
Aluminum is susceptible to deterioration caused by salt and other road contaminants. Use a sponge and mild detergent to wipe away promptly.
Be careful not to use harsh chemicals (including some commercial wheel cleaners) or a stiff brush. They can damage the clear coat of the aluminum alloy wheels that helps keep the aluminum from corroding and tarnishing.
See also:
If the Malfunction Indicator Lam Comes On or Blinks
■ Reasons for indicator lamp to come on or blink
• Comes on when there is a problem with the engine emissions control
system, or the fuel fill cap is missing, or loose.
• Blinks when en ...
Playing the AM/FM Radio
To Play the AM/FMRadio
The ignition switch must be in the ACCESSORY (I) or ON (II) position.
Turn the system on by pushing the PWR/VOL knob or the AM/FM button (AM or FM
button except Sport mode ...
Changing the Rear Wiper Blade Rubber
1. Raise the wiper arm off.
2. Pivot up the bottom end of the wiper blade
until it comes off from the wiper arm.
3. Slide the wiper blade out from the end with
the indent.
NOTICE
Avoid dro ...
Categories
