
Honda Fit: Throttle Body Removal/Installation
 |
|
Do not insert your fingers into the installed throttle body when you turn the ignition switch to ON (II) or while the ignition switch is in ON (II). If you do, you will seriously injure your fingers if the throttle valve is activated. |
NOTE: If you are replacing or cleaning the throttle body, start at step 1. If you are removing the throttle body temporarily, begin at step 4.
-
Connect the HDS to the DLC while the engine is stopped.
-
Select the INSPECTION MENU on the HDS.
-
Do the TP POSITION CHECK in the ETCS TEST.
-
Turn the ignition switch to LOCK (0).
-
Remove the air cleaner.
-
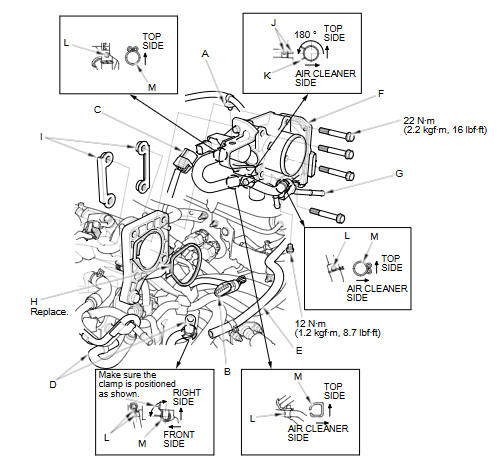
Remove the harness clamp (A).
-
Disconnect the throttle body connector (B), and the EVAP canister purge valve connector (C).
-
Disconnect and plug the water bypass hoses (D) and the purge hose (E).
-
Remove the throttle body (F).
-
Remove the purge pipe (G), the water bypass hoses, and the purge hose from the throttle body.
-
Install the parts in the reverse order of removal with a new gasket (H), then refill the radiator with engine coolant.
NOTE:
-
If you replace or clean the throttle body, go to step 12.
-
If you did not replace or clean the throttle body, this procedure is complete.
-
Be careful not to drop or damage the plates (I).
-
Align the marks (J) on the hose and throttle body, then insert the hose. Make sure the clamp (K) is positioned as shown.
-
Align the mark (L) on the hose as shown, then insert the hose. Make sure the clamp (M) is positioned as shown.
-
-
Turn the ignition switch to ON (II).
-
Reset the ECM/PCM with the HDS.
-
Select the ETCS TEST in the INSPECTION MENU with the HDS.
-
Select the TP POSITION CHECK, then clear the throttle position (TP) learned value.
-
Turn the ignition switch to LOCK (0).
-
Turn the ignition switch to ON (II), and wait 2 seconds without pressing the accelerator pedal.
-
Do the ECM/PCM idle learn procedure.
See also:
Door Locks
Each door has a lock tab on the top of the door. Push in the tab to lock the
door, and pull it out to unlock.
On Canadian DX model
To lock the passenger’s door when getting out of the vehicle, ...
Starting the Engine
1. Make sure the parking brake is applied.
Automatic transmission models
2. Check that the shift lever is in
, then
depress the brake pedal.
► Although it is possible to start the vehic ...
CD Player
If a disc error occurs, you may see the following error messages.
...
Categories
