Honda Fit: Fuel Pressure Regulator Replacement
-
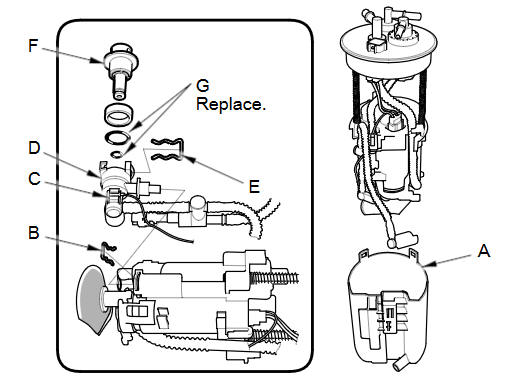
Remove the fuel tank unit.
-
Remove the reservoir (A).
-
Remove the clip (B) and the ground wire (C), then remove the bracket (D).
-
Remove the clip (E), then remove the fuel pressure regulator (F).
-
Install the parts in the reverse order of removal with new O-rings (G) and a new bracket. When installing the fuel tank unit, align the marks on the unit and the fuel tank.
NOTE:
-
Coat the O-rings with clean engine oil; do not use any other oils or fluids.
-
Do not pinch the O-rings during installation.
-
Use all the new parts supplied in the pressure regulator replacement kit.
-
See also:
VSA® (Vehicle Stability Assist), aka ESC (Electronic Stability Control),
System
VSA® helps to stabilize the vehicle during cornering if the vehicle turns
more or less
than what was intended. It also assists in maintaining traction on slippery
surfaces.
It does so by regu ...
Installation (Part -3)
Remove the vinyl tape from the connectors.
Connect the EPS motor angle sensor 8P connector (A), torque sensor 6P connector (B) to the steering gearbox.
...
Protecting Larger Children
Checking Seat Belt Fit
To determine if a lap/shoulder belt properly fits a child, have the child put
on the seat belt, then ask yourself:
1. Does the child sit all the way back against the seat? ...
Categories
