Honda Fit: Lights
Headlight Aiming
The headlights were properly aimed when your vehicle was new. If you regularly carry heavy items in the cargo area, readjustment may be required. Adjustments should be done by your dealer or other qualified mechanic.
Replacing a Headlight Bulb
Your vehicle has halogen headlight bulbs. When replacing a bulb, handle it by its base, and protect the glass from contact with your skin or hard objects. If you touch the glass, clean it with denatured alcohol and a clean cloth.

Halogen headlight bulbs get very hot when lit. Oil, perspiration, or a scratch on the glass can cause the bulb to overheat and shatter.
1. To change the bulb on the driver’s side, start the engine, turn the steering wheel all the way to the right, then turn off the engine. To change the bulb on the passenger’s side, turn the steering wheel to the left.
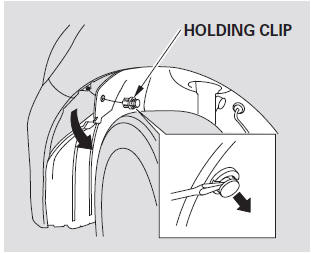
2. Use a flat-tip screwdriver to remove the holding clip from the inner fender, then pull the inner fender cover back.
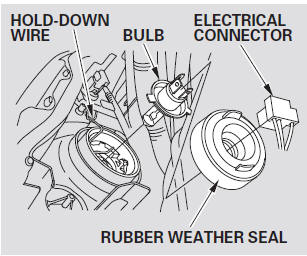
3. Remove the electrical connector from the bulb by pulling the connector straight back.
4. Remove the rubber weather seal by pulling on the tab.
5. Unclip the end of the hold-down wire from its slot. Pivot the wire out of the way, then remove the bulb.
6. Install the new bulb into the hole, making sure the tabs are in their slots. Pivot the hold-down wire back in place, and clip the end into the slot.
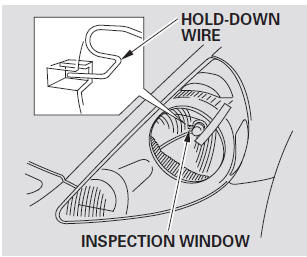
7. Make sure that the hold-down wire is installed properly and securely. You can check its installation from the inspection window on the headlight assembly.
8. Install the rubber seal over the back of the headlight assembly.
9. Push the electrical connector onto the new bulb. Make sure it is connected securely. Turn on the headlights to test the new bulb.
10. Reinstall the inner fender cover.
Then reinstall the holding clip, and lock it in place by pushing on its center.
Replacing a Parking Light/Front Side Marker Bulb and a Turn Signal Light Bulb
1. To change the bulb on the driver’s side, start the engine, turn the steering wheel all the way to the right, then turn off the engine. To change the bulb on the passenger’s side, turn the steering wheel to the left.
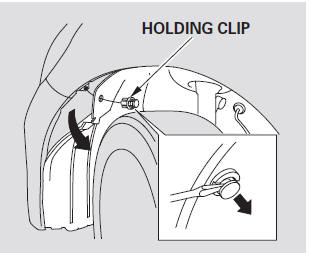
2. Use a flat-tip screwdriver to remove the holding clip from the inner fender, then pull the inner fender cover back.
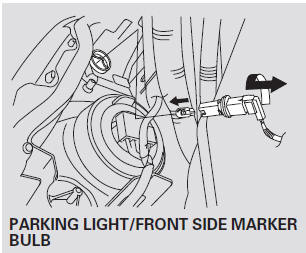
3. Remove the socket by turning it one-quarter turn counterclockwise.
4. Pull the bulb straight out of its socket. Push the new bulb straight into the socket until it bottoms.
5. Reinstall the socket into the light assembly by turning it clockwise until it locks.
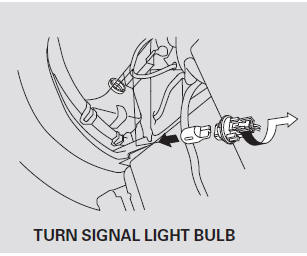
6. Turn on the lights to make sure the new bulb is working.
7. Reinstall the inner fender cover.
Then reinstall the holding clip, and lock it in place by pushing on its center.
Replacing a Fog Light Bulb
On Sport model
The fog lights use halogen bulbs.
When replacing a bulb, handle it carefully.
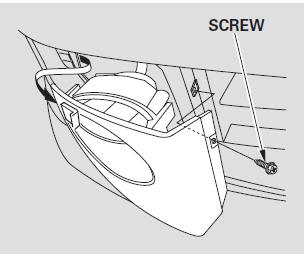
1. Use a Phillips-head screwdriver to remove the screw.
2. To remove the fog light assembly, slide it inward, then carefully pull it out of the bumper.
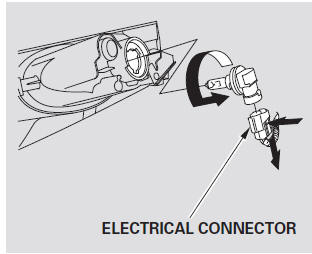
3. Remove the electrical connector from the bulb by squeezing the connector to unlock the tab, then slide the connector off the bulb.
4. Remove the bulb by turning it about one-quarter turn counterclockwise.
5. Insert the new bulb into the hole, and turn it one-quarter turn clockwise to lock it in place.
6. Push the electrical connector back onto the bulb. Make sure it is on all the way.
7. Turn on the fog lights to test the new bulb.
8. Reinstall the fog light assembly, then tighten the screw.
Replacing Rear Bulbs
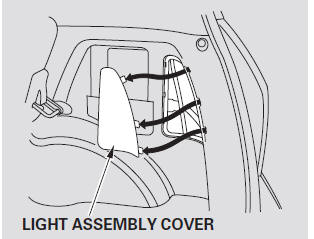
1. Open the tailgate. Place a cloth on the edge of the light assembly cover. Remove the cover by carefully prying in the notch on its middle edge with a flat-tip screwdriver.
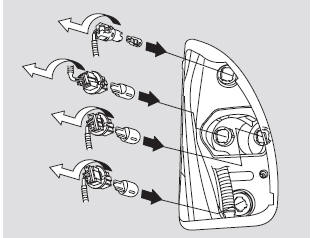
2. Determine which of the four bulbs is burned out: stop/taillight, backup light, turn signal light, or taillight.
3. Remove the socket by turning it one-quarter turn counterclockwise.
4. Remove the burned out bulb from the socket by pulling it straight out of its socket.
5. Install the new bulb in the socket.
6. Turn on the lights to make sure the new bulb is working.
7. Reinstall the socket into the light assembly by turning it clockwise until it locks.
8. Reinstall the light assembly cover.
Replacing a High-mount Brake Light Bulb
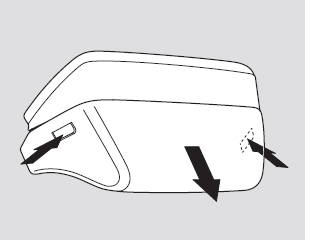
1. Open the tailgate. Remove the light assembly cover by pushing in the tabs on both sides and pulling the cover off.
2. Remove the socket from the light assembly by turning it one-quarter turn counterclockwise.

3. Pull the bulb straight out of its socket. Push the new bulb straight into the socket until it bottoms.
4. Press the brake pedal to make sure the new bulb is working.
5. Put the socket back into the light assembly, and turn it clockwise to lock it in place.
6. Put the cover back on the light assembly. Push it in until it locks in place.
See also:
Pilot Bearing Inspection
Inspect the crankshaft pilot bearing for wear and damage.
Inspect the inside surface of the crankshaft pilot bearing with your
finger. If the crankshaft pilot bearing is not smoot ...
Your Vehicle’s Safety Features
Your vehicle is equipped with many features that work together to protect you
and your passengers during a crash.
Some features do not require any action on your part. These include a strong
st ...
Safety of Larger Children
WARNING
Allowing a child age 12 or under to sit in
front can result in injury or death if the
passenger’s front airbag inflates.
If a larger child must ride in front, move the
vehicle seat as ...
Categories
