Honda Fit: Maintenance Minder
Your vehicle displays engine oil life and maintenance service items on the information display to show you when you should have your dealer do engine oil replacement and indicated maintenance service.
Based on the engine operating conditions and accumulated engine revolutions, the onboard computer in your vehicle calculates the remaining engine oil life and displays it as a percentage.
Engine Oil Life Display
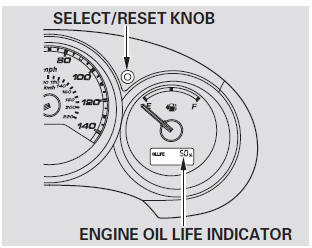
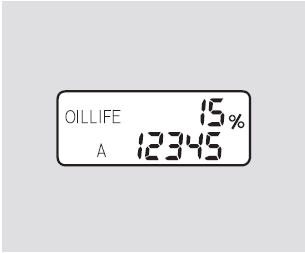
To see the current engine oil life, turn the ignition switch to the ON (II) position, then press and release the select/reset knob repeatedly until the engine oil life indicator appears.
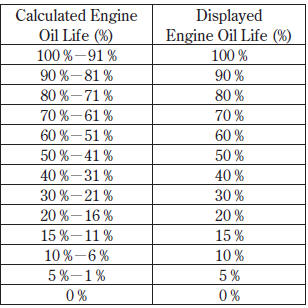
The remaining engine oil life is shown on the display according to this table:
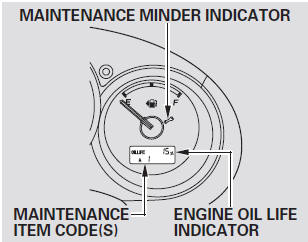
If the remaining engine oil life is 15 to 6 percent, you will see the engine oil life indicator every time you turn the ignition switch to the ON (II) position. The maintenance minder indicator will also come on, and the maintenance item code(s) for other scheduled maintenance items needing service will be displayed below the ‘‘OIL LIFE’’ message.
If the remaining engine oil life is 15 to 6 percent, you will see the engine oil life indicator every time you turn the ignition switch to the ON (II) position. The maintenance minder indicator will also come on, and the maintenance item code(s) for other scheduled maintenance items needing service will be displayed below the ‘‘OIL LIFE’’ message.
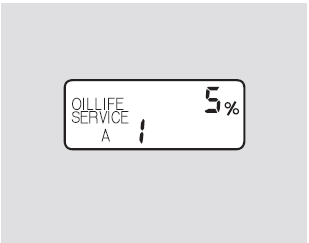
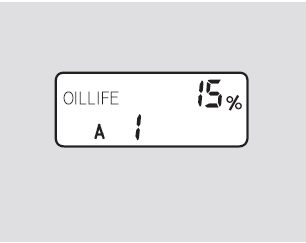
When the remaining engine oil life is 5 to 1 percent, you will see a ‘‘SERVICE’’ message along with the same maintenance item code(s), every time you turn the ignition switch to the ON (II) position
The maintenance item code or codes indicate the main and sub items required at the time of the oil change.
You can switch the information display from the engine oil life display to the odometer or the trip meter. Press and release the select/ reset knob on the instrument panel.
When the engine oil life is 15 to 1 percent, the maintenance minder indicator
(  ) comes on every time you turn the
ignition switch to the ON (II) position, then it goes out if you switch the information
display.
When you see this message, have the indicated maintenance performed by your dealer as soon as possible.
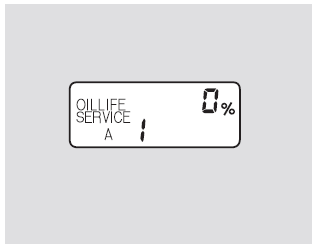
When the remaining engine oil life is 0 percent, the engine oil life indicator
will blink. The display comes on every time you turn the ignition switch to the
ON (II) position. The maintenance minder indicator (
) also comes on and remains on in the instrument panel. When you see this message,
immediately have the indicated maintenance done by your dealer.
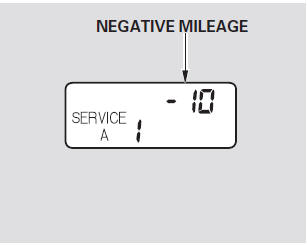
If you do not perform the indicated maintenance, negative mileage is displayed and begins to blink after the vehicle has been driven 10 miles (10 km) or more.
Negative mileage means your vehicle has passed the maintenance required point.
Immediately have the indicated maintenance done by your dealer.
To change the information display from the engine oil life display to the odometer or the trip meter, press and release the select/reset knob.
When the engine oil life is 0 percent or negative mileage, the maintenance minder
indicator ( ) remains on even if you
change the information display.
Immediately have the service performed, and make sure to reset the display as described on the following.
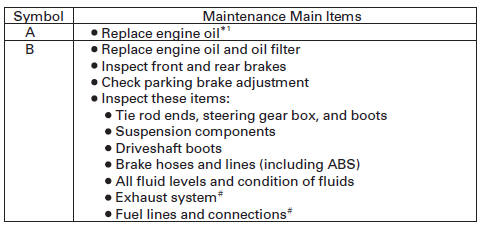
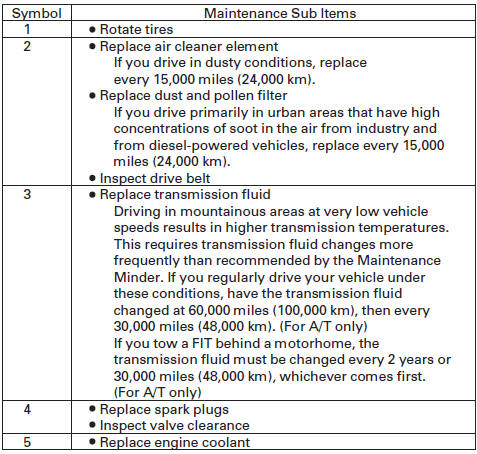
Maintenance Main Items and Sub Items
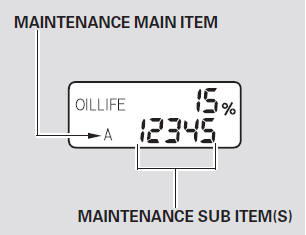
All maintenance items displayed on the information display are in code.
Resetting the Engine Oil Life Display
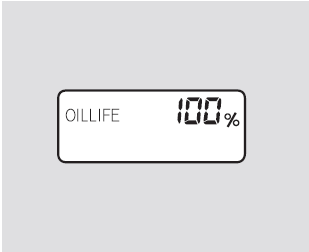
Your dealer will reset the display after completing the required maintenance service. You will see ‘‘OIL LIFE 100%’’ on the information display the next time you turn the ignition switch to the ON (II) position.
If maintenance service is done by someone other than your dealer, reset the maintenance minder as follows:
1. Turn the ignition switch to the ON (II) position.
2. Press the select/reset knob repeatedly until the engine oil life is displayed.
3. Press the select/reset knob for about 10 seconds. The engine oil life and the maintenance item code(s) will blink.
4. Press the select/reset knob for another 5 seconds. The maintenance item code(s) will disappear, and the engine oil life will reset to ‘‘100.’’
Important Maintenance Precautions
If you have the required service done but do not reset the display, or reset the display without doing the service, the system will not show the proper maintenance intervals. This can lead to seriousmechanical problems because you will no longer have an accurate record of when maintenance is needed.
Your authorized Honda dealer knows your vehicle best and can provide competent, efficient service
However, service at a dealer is not mandatory to keep your warranties in effect. Maintenance may be done by any qualified service facility or person who is skilled in this type of automotive service. Make sure to have the service facility or person reset the display as previously described. Keep all receipts as proof of completion, and have the person who does the work fill out your Honda Service History or Canadian Maintenance Log. Check your warranty booklet for more information.
We recommend using Honda parts and fluids whenever you have maintenance done. These are manufactured to the same high quality standards as the original components, so you can be confident of their performance and durability.
U.S. Vehicles: Maintenance, replacement, or repair of emissions control devices and systems may be done by any automotive repair establishment or individual using parts that are ‘‘certified’’ to EPA standards.
According to state and federal regulations, failure to perform maintenance on
the items marked with  will not void
your emissions warranties. However, all maintenance services should be performed
in accordance with the intervals indicated by the information display.
Owner’s Maintenance Checks
You should check the following items at the specified intervals. If you are unsure of how to perform any check, turn to the appropriate page listed.
• Engine oil level - Check every time you fill the fuel tank.
• Engine coolant level - Check the radiator reserve tank every time you fill the fuel tank.
• Automatic transmission - Check the fluid level monthly. • Brakes - Check the fluid level monthly.
• Tires - Check the tire pressure monthly. Examine the tread for wear and foreign objects.
• Lights - Check the operation of the headlights, parking lights, taillights, high-mount brake light, and license plate lights monthly.
* 1: If themessage, ‘‘SERVICE’’ does not appear more than 12months after the display is reset, change the engine oil every year.
 : See information onmaintenance and
emissions warranty
NOTE: • Independent of maintenancemessage in the information display, replace the brake fluid every 3 years.
• Inspect idle speed every 160,000miles (256,000 km).
• Adjust the valves during services A, B, 1, 2, or 3 only if they are noisy.
See also:
Airbag Care
You do not need to, and should not, perform any maintenance on or replace any
airbag system components yourself. However, you should have your vehicle
inspected by a dealer in the following situatio ...
Electrical
...
Adjusting the Sound
AUDIO button (
►AUDIO MENU ) ► SOUND
Adjust the sound bass, treble, fader, and balance. In addition, you can set
Speedsensitive
Volume Compensation (SVC).
1. Select the tab to adju ...
Categories
