Honda Fit: Seats
Front Seat Adjustments
Make all seat adjustments before you start driving.
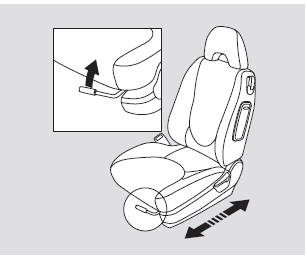
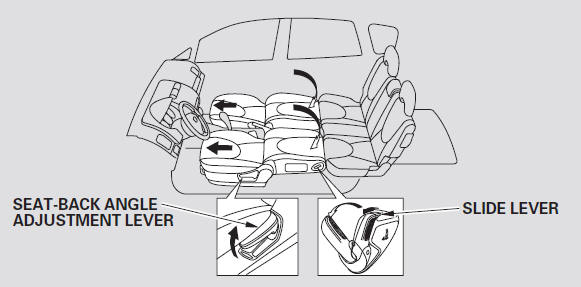
To adjust the seat forward and backward, pull up on the lever under the seat cushion’s front edge. Move the seat to the desired position, and release the lever. Try tomove the seat to make sure it is locked in position.
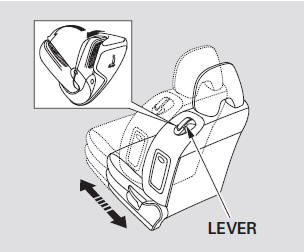
The seat can also be adjusted forward and backward using the lever on the side of the seat-back.
Pull out the lever and push it forward, holding the seat-back with your hand.
Move the seat to the desired position, and check the seat tomake sure it is locked in position.
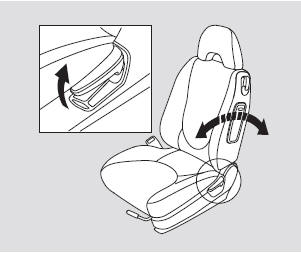
To change the seat-back angle of the front seat, pull up the lever on the outside of the seat bottom.
Once a seat is adjusted correctly, rock it back and forth to make sure it is locked in position.
Rear Seat Adjustments
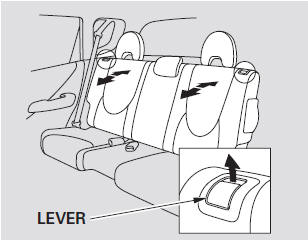
You can adjust the angle of the rear seat-backs separately. To change the seat-back angle, pull up the release lever on the outer side of the seatback.
Head Restraints
Your vehicle is equipped with head restraints in all seating positions to help protect you and your passengers from whiplash and other injuries.
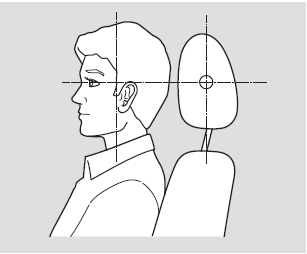
They are most effective when you adjust them so the center of the back of the occupant’s head rests against the center of the restraint.
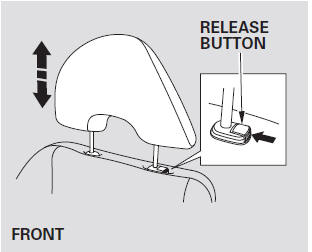
The front head restraints adjust for height. You need both hands to adjust a restraint. Do not attempt to adjust it while driving. To raise it, pull upward. To lower the restraint, push the release button sideways, and push the restraint down.
The front head restraints adjust for height. You need both hands to adjust a restraint. Do not attempt to adjust it while driving. To raise it, pull upward. To lower the restraint, push the release button sideways, and push the restraint down.

Failure to reinstall the head restraints can result in severe injury during a crash.
Always replace the head restraints before driving.
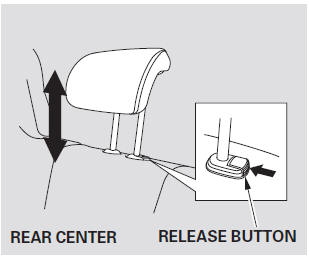
When a passenger is seated in the rear center seating position, make sure the center head restraint is properly positioned.
Make sure the head restraint locks in position when you reinstall it.
Reclining the Front Seats
You can recline the seat-backs on the front seats so they are level with the rear seat cushions, making a large cushioned area. To do this: 1. Recline the rear seat-backs as far backward as possible.
2. Remove the front head restraints, and store them securely.
3. Using the slide lever, move the front seat cushions as far forward as possible.
4. Pull up the seat-back angle adjustment lever, and pivot the seat-back backward until it is level with the rear seat cushion.
Reverse this procedure to return the front seats to the upright position.
When you return the seat-back to its upright position, hold the seat-back to keep it from going up too quickly.
Make sure you install the head restraints and securely lock the seats before driving.
Folding the Rear Seat Up
The left and right rear seat cushions can be lifted up separately to make room for cargo.
Remove any items from the seat before you fold up the seat cushion.
Pull up the rear seat cushion, and fold the seat leg down. Push the seat cushion firmly against the seat-back to lock it.

To return the seat cushion to its original position, first make sure there are no items on the floor, then pull up the seat leg fully, and push down the seat cushion slowly while holding it with your hands. Set the seat leg in the floor guide. A latch comes out when the leg is set properly.
Folding the Rear Seat Down
The rear seat-backs can be folded down for more cargo room.
Each side folds down separately, so you can still carry a passenger in the rear outer seating position.
Remove any items from the seat before folding down the seat-back.
Make sure there are no items on the floor before folding down the seats.
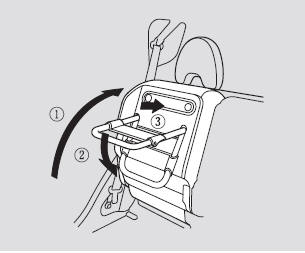
When you fold down the driver’s side rear seat, use the latch plate to release the center seat belt from the detachable anchor.
Allow the seat belt to retract into the holder on the ceiling, and store the buckles in it.
1. Move the front seat cushions as far forward as possible.
2. Make sure the rear outer head restraint is locked in place. If you fold down the driver’s side seatback, also adjust the rear center head restraint to its lowest position.
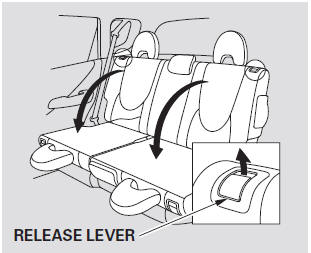
3. Pull up the release lever on the outside of the seat-back.
4. Fold the seat-back forward.
5. Move the front seat backward to the desired position. Make sure the seat is locked in place.
Do not put any heavy items on the seat-back when it is folded down.
Make sure that the folded down rear seat does not interfere with the front passenger’s seat-back. This will cause the front passenger’s weight sensors and the front passenger’s seat belt reminder indicator to work improperly.
Also check the passenger airbag off indicator to assure proper operation of the passenger’s front airbag.
To return the seat-back to its upright position, move the front seat forward again, then lift up the seat-back.
While lifting the seat-back, the seat cushion may come up with it.
Make sure the seat-back and seat cushion are locked securely and all rear shoulder belts are positioned in front of the rear seat-backs. In the center seating position of the rear seat, be sure the detachable anchor is latched securely before using the seat belt.
Make sure all items in the cargo area are secured. Loose items can fly forward and cause injury if you have to brake hard.
Detachable Anchor
The seat belt in the rear center seat is equipped with a detachable anchor.
This allows the center seat belt to be unlatched when the driver’s side rear seat is folded.

Using a seat belt with the detachable anchor unlatched increases the chance of serious injury or death in a crash.
Before using the seat belt, make sure the detachable anchor is correctly latched.
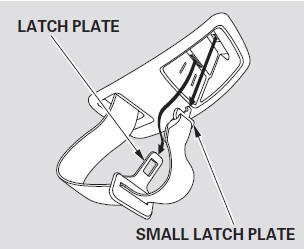
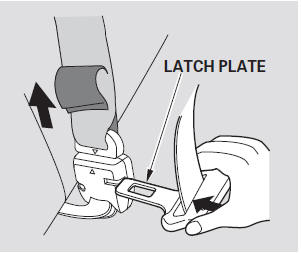
Pull out the small latch plate and the latch plate from each holding slot in the ceiling, and pull out the seat belt to extend it.
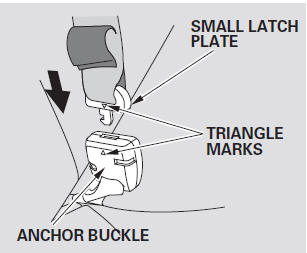
Line up the triangle marks on the small latch plate and anchor buckle when reattaching the belt and buckle.
Tug on the seat belt to verify that the detachable anchor is securely latched. Make sure the seat belt is not twisted.
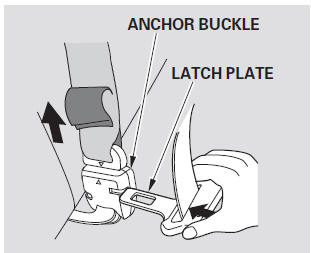
To unlatch the detachable anchor, insert the latch plate into the slot on the side of the anchor buckle. Store the detachable anchor and seat belt latch plates in the retractor housing.
See also:
Ignition Coil and Spark Plug Removal/Installation
Remove the under-cowl panel.
Disconnect the ignition coil connectors (A), then remove the ignition
coils (B).
Remove the spark plugs, and inspect them.
...
A/T Housing Reverse Idler Gear Installation (A/T)
Lightly coat the reverse idler gear shaft (A), the needle bearing (B),
and new O-rings (C) with lithium grease.
Assemble the new O-rings and the needle bearing on the reverse ...
Immobilizer System Description
The vehicle is equipped with a Type VII immobilizer system that disables the
vehicle unless a programmed ignition key is used.
This system consists of a transponder combined with a keyless transmit ...
Categories
