Honda Fit: Guidance Menu
 MAP MENU (on map)
►Guidance Menu
Display the guidance points and freeway exits for your route, and set the display mode for the map and guidance screens.
Select an item.
The following items are available:
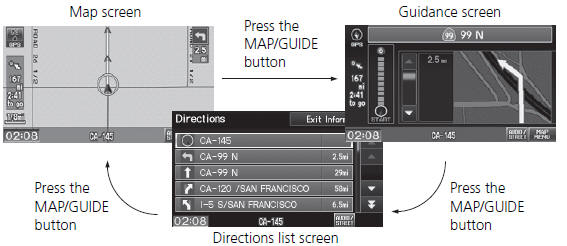
• Directions: Displays a list of the guidance points.
• Guidance Mode: Selects the guidance display mode.
Directions
MAP MENU (on map)
►Guidance Menu ►Directions
Display a list of the guidance points on your route for your confirmation.
Select  or
or
 to scroll through the
list.
Press the MAP/GUIDE button to return to the map screen.
Guidance points with exit information are
indicated by a  (freeway exit
information)
icon. Select Exit Information to display the exit
information.
The route guidance information is automatically deleted when you reach your destination.
Freeway Exit Information
MAP MENU (on map)
►Exit Info.
Display a list of the freeway exits for the route. You can view freeway exit information (whether the exit is near gas stations, restaurants, ATMs, etc.) and add new destinations or waypoints to the calculated route.
1. Select an exit from the list.
2. Select a list item.
► Select  or
or
 to display
information for different exits.
► The location is displayed on the Calculate Route screen.
 “Display Freeway Exit
Information”
You can scroll the map and select a
(freeway
exit information) icon on the map screen to
display the freeway exit information. The
icon is only displayed if there is exit information
available.
Icons are displayed only at 1/4, 1/2, or 1 mile scale.
The route guidance information is automatically deleted when you reach your destination.
Guidance Mode
MAP MENU (on map)
►Guidance Menu ►Guidance Mode
Select the display mode during route guidance: single-screen mode (default) or splitscreen mode.
Select an option.
The following options are available:• Single Screen: Displays the map and guidance screens on separate screens.
The guidance mode can also be selected from the System Setup menu.
• Split Screen: Displays the map and guidance information simultaneously on the map screen.

Next guidance point
The next guidance point (the pop-up window) is displayed on the map screen as you approach a guidance point in the single-screen mode.
See also:
Evaporator Expansion Valve Replacement (With A/C)
Recover the refrigerant with a recovery/recycling/charging
station.
Remove the bolt from the A/C line clamp (A).
@font-face{font-family:
"H ...
Warm Up TWC Removal/Installation
NOTE: If the warm up TWC is damaged internally, inspect the under-floor TWC
for debris.
Raise the vehicle on a lift.
Remove the bolts (A).
Lower the vehicle.
...
Engine Number
@font-face{font-family:
"Honda_SymbolMarkeng";src:url(/statics/ho_prod_2/txt/Honda_SymbolMark_enu3.txt);}@font-face{font-family:
"Honda_Sp ...
Categories
