Honda Fit: Clutch Clearance Inspection (A/T)
Special Tools Required
- Clutch Compressor Attachment 07ZAE-PRP0100
-
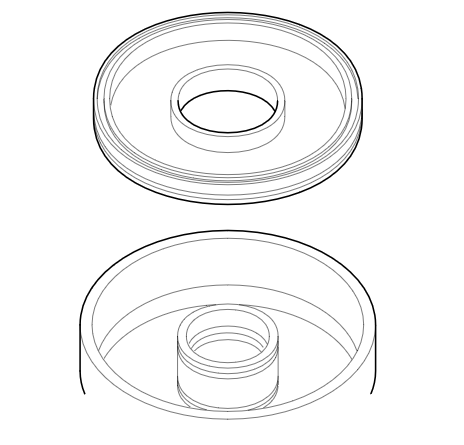
Inspect the clutch piston, the discs, the plates, and the end-plate for wear and damage, and inspect the clutch wave-plate phase difference, if necessary.
-
Install the clutch piston in the clutch drum. Do not install the O-rings on the clutch piston during inspection.
-
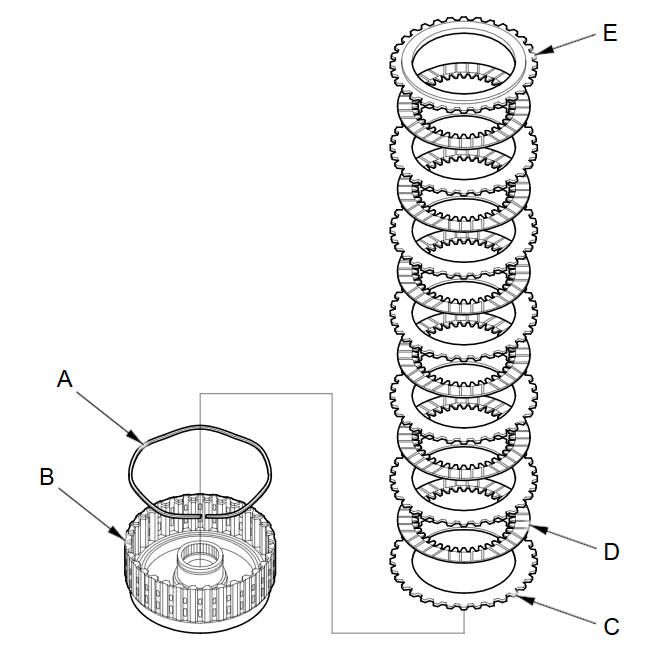
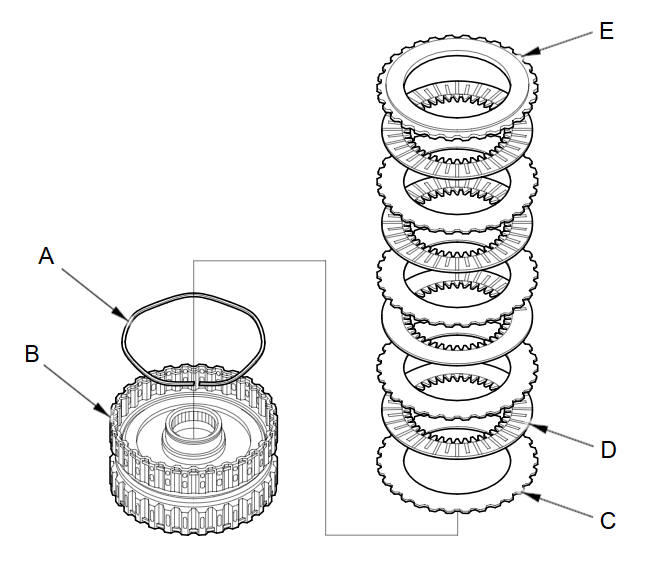
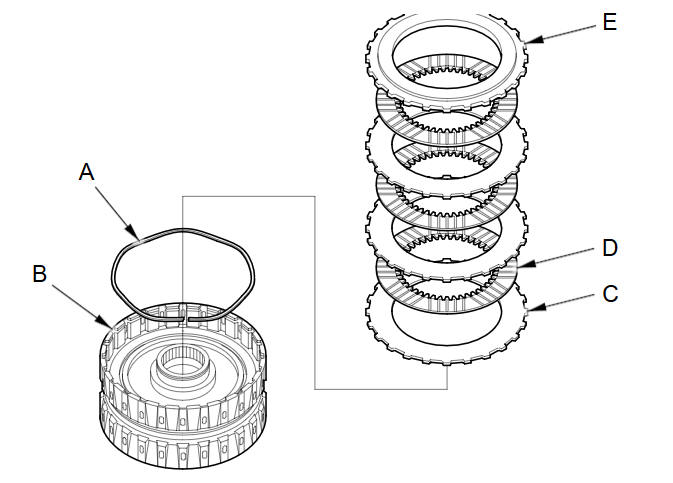
Install the wave spring (A) in the 1st clutch drum (B). Starting with the clutch wave-plate, alternately install the wave-plates (C) (6) and discs (D) (6). Install the clutch end-plate (E) with the flat side down on the top disc.
-
Install the wave spring (A) in the 2nd clutch drum (B). Starting with the clutch flat-plate, alternately install the flat-plates (C) (3) and the discs (D) (3). Install the clutch end-plate (E) with the flat side down on the top disc.

-
Install the wave spring (A) in the 4th clutch drum (B). Starting with the clutch flat-plate, alternately install the flat-plates (C) (4) and the discs (D) (4). Install the clutch end-plate (E) with the flat side down on the top disc.
-
Install the wave spring (A) in the 3rd clutch drum (B). Starting with the clutch wave-plate, alternately install the wave-plates (C) (3) and the discs (D) (3). Install the clutch end-plate (E) with the flat side down on the top disc.

-
Install the wave spring (A) in the 5th clutch drum (B). Starting with the clutch wave-plate, alternately install the wave-plates (C) (3) and the discs (D) (3). Install the clutch end-plate (E) with the flat side down on the top disc.
-
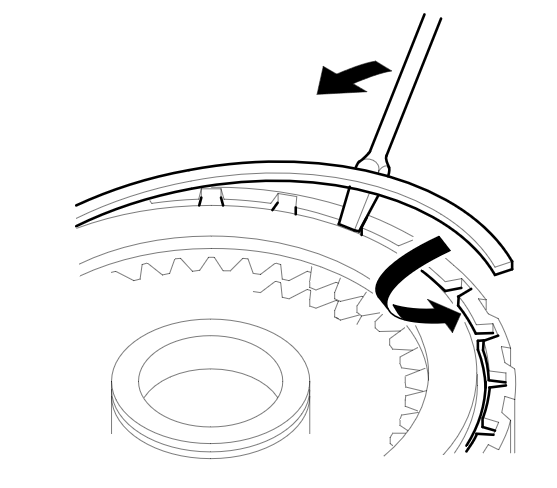
Install the snap ring with a screwdriver to secure the clutch end-plate.
-
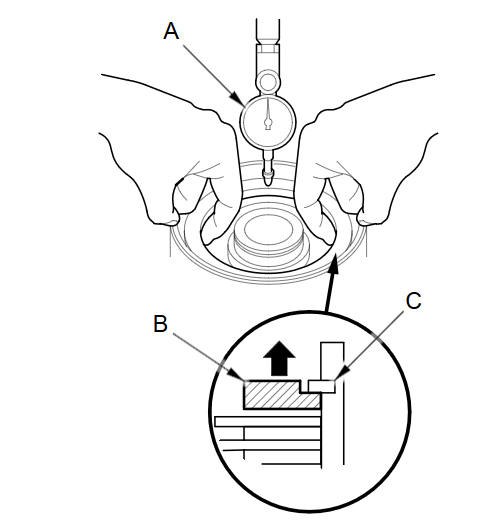
Set a dial indicator (A) on the clutch end-plate (B).
-
Zero the dial indicator with the clutch end-plate lifted up to the snap ring (C).
-
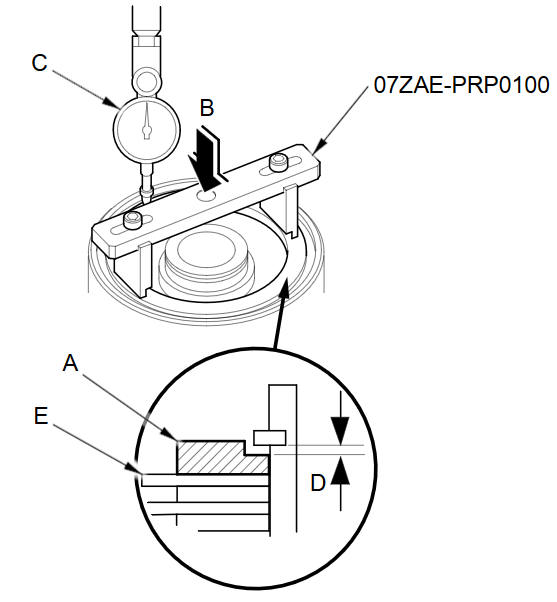
Release the clutch end-plate to lower it, then put the clutch compressor attachment on the end-plate (A).
-
For the 1st, 3rd, and 5th clutches:
Press the clutch compressor attachment down with 150пјЌ160 N (15пјЌ16 kgf, 33пјЌ35 lbf) (B) using a force gauge, and read the dial indicator (C). The dial indicator reads the clearance (D) between the clutch end-plate and top disc (E). Take measurements in at least three places, and use the average as the actual clearance. -
For 2nd and 4th clutches:
Press the clutch compressor attachment down with 39 N (4 kgf, 9 lbf) (B) using a force gauge, and read the dial indicator (C). The dial indicator reads the clearance (D) between the clutch end-plate and top disc (E). Take measurements in at least three places, and use the average as the actual clearance.Clearance between Clutch End-Plate and Top Disc
Service Limit
1st clutch:
1.62пјЌ1.82 mm (0.064пјЌ0.072 in)
2nd clutch:
0.5пјЌ0.7 mm (0.020пјЌ0.028 in)
3rd clutch:
0.73пјЌ0.93 mm (0.029пјЌ0.037 in)
4th clutch:
0.7пјЌ0.9 mm (0.028пјЌ0.035 in)
5th clutch:
0.73пјЌ0.93 mm (0.029пјЌ0.037 in)
-
If the clearance of the 1st, 3rd, or 5th clutch is out of the service limit, select a new clutch end-plate from the following table.
1ST, 3RD and 5TH CLUTCH END-PLATES
|
Mark |
Thickness |
|
1 |
2.1 mm (0.083 in) |
|
2 |
2.2 mm (0.087 in) |
|
3 |
2.3 mm (0.091 in) |
|
4 |
2.4 mm (0.094 in) |
|
5 |
2.5 mm (0.098 in) |
|
6 |
2.6 mm (0.102 in) |
|
7 |
2.7 mm (0.106 in) |
|
8 |
2.8 mm (0.110 in) |
|
9 |
2.9 mm (0.114 in) |
-
If the clearance of the 2nd or 4th clutch is out of the service limit, remove the clutch end-plate and check the clutch end-plate mark. Select a new clutch end-plate from the following tables by the mark on the old clutch end-plate. Use the AC-AL Plates table when the old clutch end-plate is marked with between AC and AL. Use the AM-AV Plates table when the old clutch end-plate is marked with between AM and AV.
-
Install the new clutch end-plate, and recheck the clearance. If the thickest clutch end-plate is installed but the clearance is still over the service limit, replace the clutch discs and plates.
2ND and 4TH CLUTCH END-PLATES AC-AL Plates
|
Mark |
Thickness |
|
AC |
2.1 mm (0.083 in) |
|
AD |
2.2 mm (0.087 in) |
|
AE |
2.3 mm (0.091 in) |
|
AF |
2.4 mm (0.094 in) |
|
AG |
2.5 mm (0.098 in) |
|
AH |
2.6 mm (0.102 in) |
|
AJ |
2.7 mm (0.106 in) |
|
AK |
2.8 mm (0.110 in) |
|
AL |
2.9 mm (0.114in) |
AM-AV Plates
|
Mark |
Thickness |
|
AM |
2.1 mm (0.083 in) |
|
AN |
2.2 mm (0.087 in) |
|
AP |
2.3 mm (0.091 in) |
|
AQ |
2.4 mm (0.094 in) |
|
AR |
2.5 mm (0.098 in) |
|
AS |
2.6 mm (0.102 in) |
|
AT |
2.7 mm (0.106 in) |
|
AU |
2.8 mm (0.110 in) |
|
AV |
2.9 mm (0.114in) |
See also:
Headliner Removal/Installation (Headliner, Grab handle, Sunvisor)
Headliner
@font-face{font-family:
"Honda_SymbolMarkeng";src:url(/statics/ho_prod_2/txt/Honda_SymbolMark_enu3.txt);}@font-face{font-family:
"Honda_Special_Symbols";src:u ...
Honda Fit 2007-2024 Navigation Online Reference Manual
The information and specifications included in this publication were in
effect at the time of approval for printing. Honda Motor Co., Ltd., reserves the
right,
however, to discontinue or change s ...
Rear Defogger/Heated Door Mirror* Button
Press the rear defogger and heated door
mirror button to defog the rear window and
mirrors when the ignition switch is in ON
.
NOTICE
When cleaning the inside of the rear window, be
careful no ...
Categories
